![]()
| A Guide to Installing the Factory Centre Differential Lock in the Discovery 2 Have you got the Hardware inside ???? | ||||
|
|
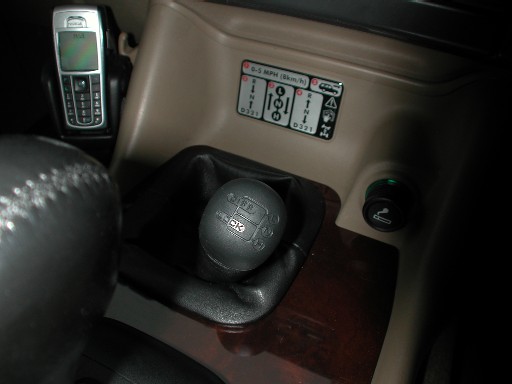
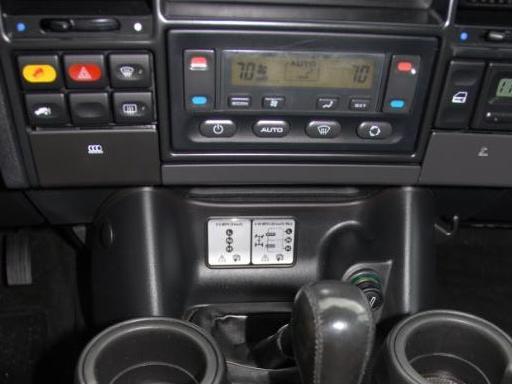
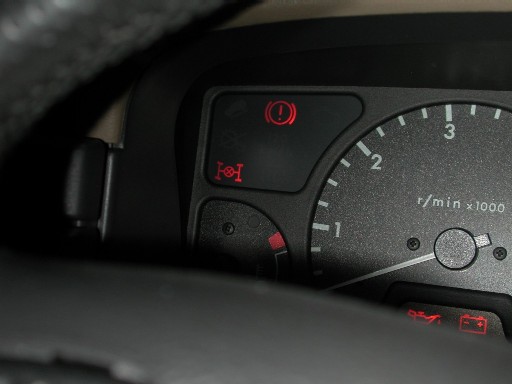 Diff lock Light on the Instrument Cluster The Discovery 2 Centre Diff Lock was not offered as an "in cab" driver control as it was "phased" out as the Traction control ABS system was introduced in the Discovery 2. However many of the earlier Discovery 2's still have the Centre differential lock installed in the transfer case and it just simply needs connecting up. The picture above shows the dash light that lights up when the diff lock is engaged. Below is the transfer lever knob that has the diff lock embossed on it as well as high - low ratio
To determine if you have the option to enable the diff lock you must find out if your transmission has a 41D or 42D prefix on its serial number. For those of you that have the Land Rover parts catalogue, this can seen in the "vehicle details" section as you load up the Microcat parts IPC with your vehicle reg No, or chassis ident number. As a "rough" guide, Land Rover Discovery 2's up to approx March 2001 will most likely have the diff lock hardware in the transfer case and will require just the factory, or an electronic linkage to enable it. We will look at the options later on. Below is a link to a small Video that will show where the Transfer Box Identifier is actually located on the case So, here we go, my car is an automatic model, the manual version should be almost identical with a few less plugs etc to remove. STEP 1
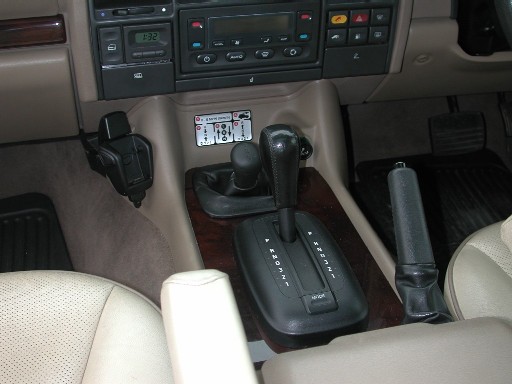
Simply use firm finger pressure to un-clip the Transfer lever leather boot in the upward direction, the same would apply to the manual lever, on an auto use a flat blunt tool to lift it slowly and un-clip it all round taking care not to damage the trim, in particular if you have a wood trim.
The Auto box mode switch needs to be unplugged now, this is a lever type plug, as you move the lever the plug disconnects automatically. Once the gaiters are free, simply unscrew the Transfer lever nob and gaiter, the auto box nob is just a push fit. Make sure the car is selected to "D" and then using a firm force pull the nob straight up and of the lever being careful not to smack yourself in the head !! STEP 3 Now carefully prize out the handbrake gaiter from the console, its easier to remove the top first.
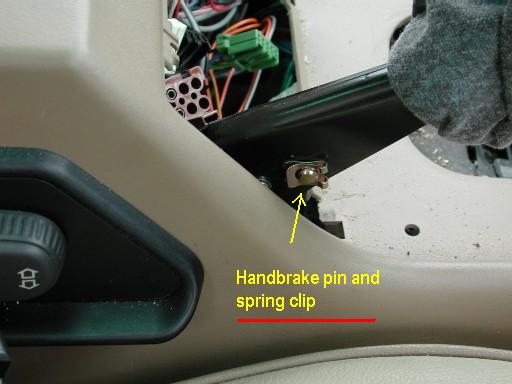
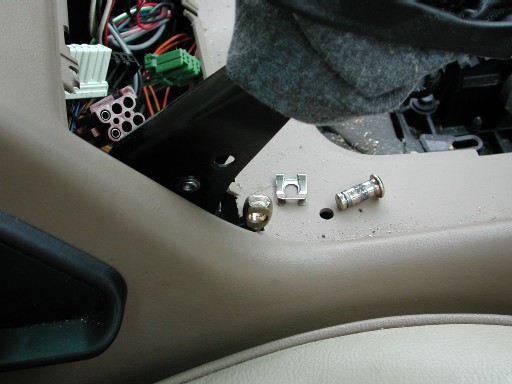
STEP 4 NOTE!!!!! Now you will be disconnecting the handbrake cable, and because you WILL move the gearlever many times out of your way during the install, ensure the car is parked on flat and level ground or CHOCK it !! The handbrake cable is help by a pin and spring clip
STEP 7 NOTE !! Once its lifted enough at the front, reach underneath and unplug the cigarette lighter socket connections (2)
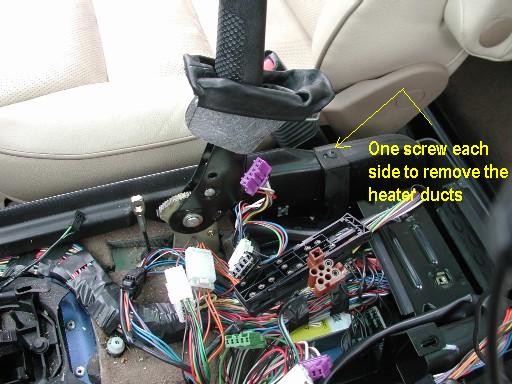
STEP 9 Once the foam is out the way, then i would suggest removing the 2 heater ducts that run to the rear vents. It does aid clearance and will stop you leaning on them and maybe distorting them
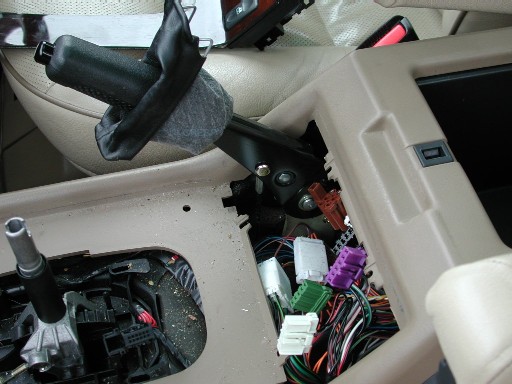
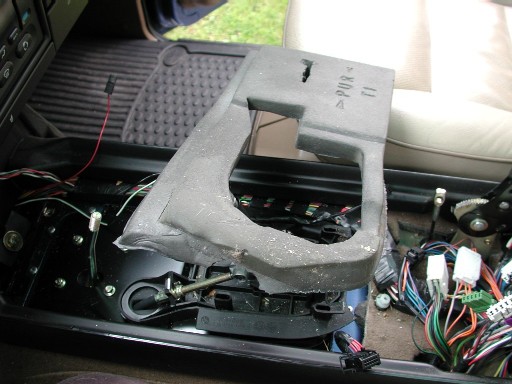
STEP 11 Before you can get any more access, you have to remove the 4 bolts securing the transfer lever to the plate.
STEP 13 Now simply disconnect the transfer lever from the cable by removing the circlip and pin clip at the cable eye end
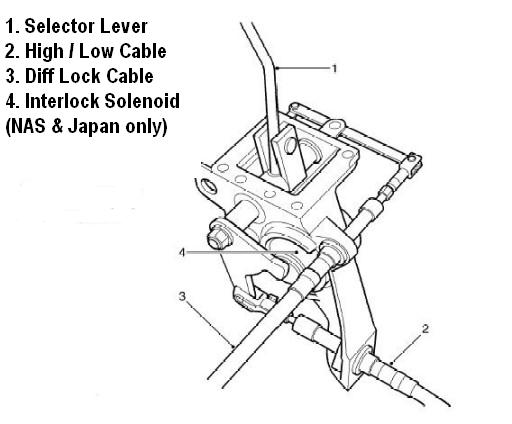
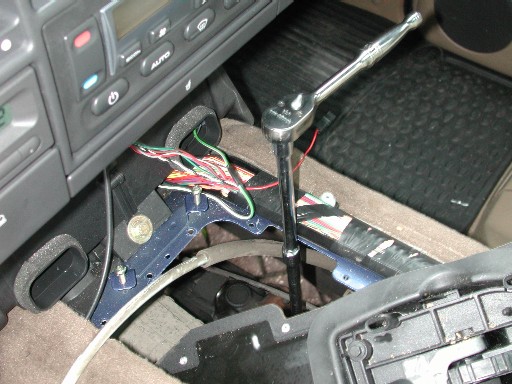
STEP 15 Here you can see the new diff lock lever, it has an additional linkage for the diff lock cable as well as the original hi-low cable. It is also "cranked" over to the right, and it sits in the centre only when the diff lock is actually engaged. It mounts using the same 4 bolts removed earlier in STEP 11
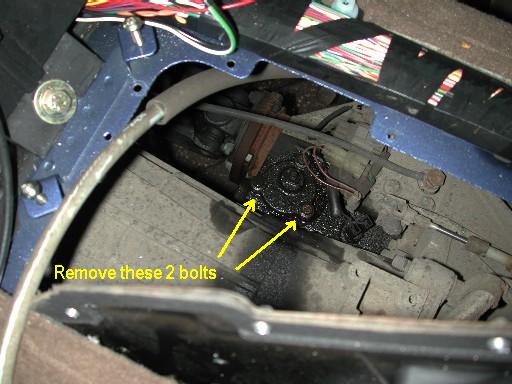
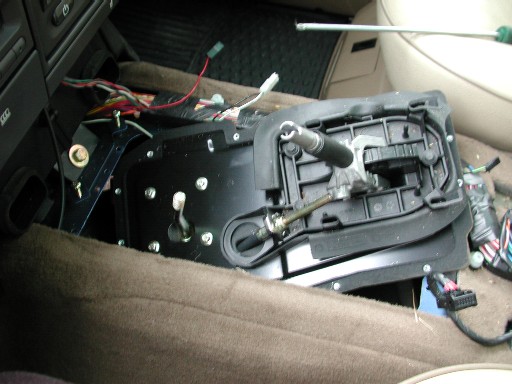
STEP 16 The mounting plate simply uses 2 of the existing bolts in the transfer case and the bracket is sculptured to go around the casting on the case. It also has a nylock nut to fit to the diff lock spigot, the small lever is shaped and will only fit one way round. see picture on STEP 18 Now its simply a case of removing the to 2 inboard bolts on the diff lock spigot plate
STEP 18 Once you have them bolts out, simply fit the bracket into position, use some thread lock on the bolts, also fit the M8 ny-lock nut to the diff lock spigot itself. You may find it easier to leave both the diff lock and high low cables disconnected from the new lever as they are quite stiff and "fight" you when fitting the bracket. You will find the diff lock spigot bracket on the new diff cable only fits one way, it should be at the same position as it is in step16 .
Tighten the lock nuts on the diff lock cable (22MM) so it stays at the correct angle. Its only a small amount of movement to engage the diff lock. The spigot turns roughly 40 degrees to the right to engage. Now connect the cable to the new lever assembly.
STEP 21 Once the wire is cut and you have either fitted connectors or taped of the ends, engage the diff lock, then switch on the ignition and start the car ( ensure handbrake is on and gear lever etc in neutral). You should now see the Diff lock light is ON, but the ABS , TC and HDC lights are off !!. This is correct as the SLABS ECU is NOT disabling them when the CDL is engaged while staring the car Lets not forget the new "knob" with diff lock embossed on it to, simple to change just unscrew the old one, and then screw on the new one !!
This is what the factory label looks like for vehicles fitted with a diff lock. This is the label I tried to get, My local dealer was very helpful in trying to get this particular label, however even after ordering ALL of them listed in the parts catalogue, this one below seems to be impossible to get !!
The FACTS about ABS , HDC, TC and Diff lock....... If you fit a diff lock and leave the wire connected to the SLABS ECU, then start the car WITH the diff lock engaged, the ABS TC and HDC lights will be illuminated, How ever, the SLABS ecu ONLY fully inhibits the TC (traction control). The HDC and ABS still function, BUT at reduced parameters ( less efficient). Some off road users like the fact that the ABS is less likely to function when off road, ie when descending steep slopes etc. This however does remove the ability to have the Diff lock AND TC together, which provides lots more traction advantages when off road. "if" you have any air lockers fitted, then loosing the TC would not be such a dis advantage. Obviously, turning off the engine and restarting with the diff lock disengaged will re-activate all 3 systems back to 100%. The choice is yours when you come to fit a diff lock. I did not want the hassle of remembering to do this when offroad, and if you ever stall the car and need to restart, you have then lost your TC again unless you remember to disengage the CDL before restarting the engine. Cut the wire and forget about it !!! ;o) or!!! READ over there ------------------------------------------>
|
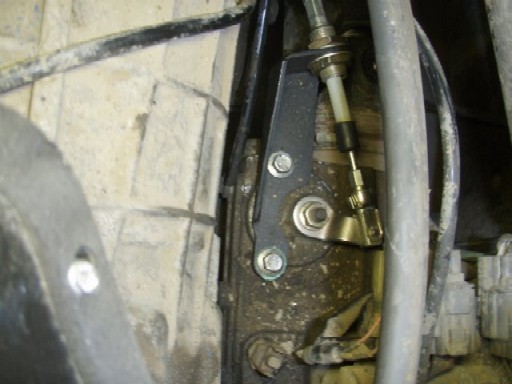
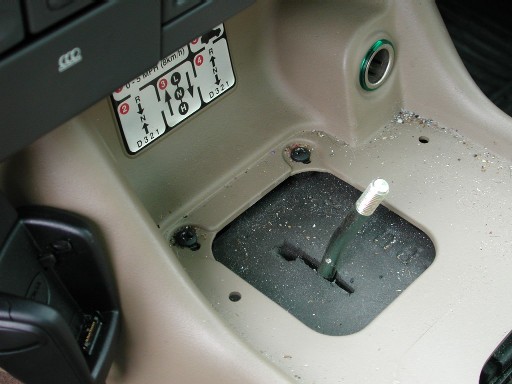
 To be 100% sure if you have the diff lock spigot, simply crawl under your Disco from the drivers side, once you see the front universal joint at the transfer case, simply reach up onto the transfer case and if you have the diff lock spigot (hardware inside) then you will be able to "feel" it. The picture above shows a view from above looking down onto the transfer case from inside the car to give you an idea of exactly where it is. Even if you don't have the diff lock hardware inside your transfer case, it is possible to add the "internal" bits required, although this will add to the cost significantly and is not covered in this article. All the parts you need are available here from Ashroft transmissions . This is the parts if you have the CDL diff lock spigot in the transfer case, if not Ashcroft can also supply you the relevant bits to go in to the transfer case as well. I cannot recommend Ashcroft enough a real pleasure to deal with and know what they are talking about.
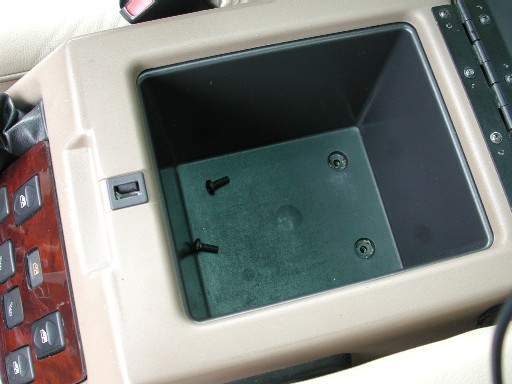
STEP 2 Next, empty all the crap you have from in the centre console cubby box, and in the bottom is 2 screws, remove those.
Next, My car has a wood trim panel, this just lifts out of place, as you get some clearance behind it, disconnect the electric window and heated seat switches.
This will reveal another 2 screws to be removed at the front of the console, and also a few years worth of dust and crums!!
STEP 5 Next you need to remove the Electric seat switches (if fitted). This can be done by either prising out from the front, or alternativley I prefered to put my hand in from behind where you removed the window switches and push them outwards.
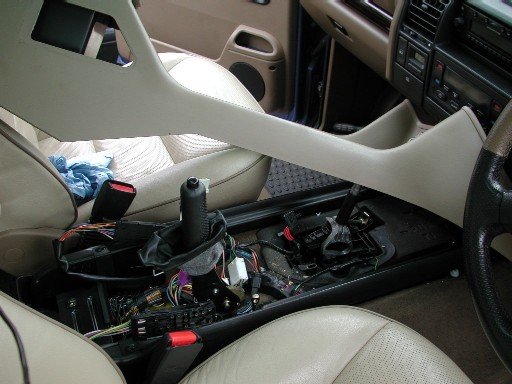
Once out, they have a quick release connector, there is 2 "knurled" tangs that you can grip and pull towards the wires to remove the plug. It does actually show a small diagram on the switch itself to show you as well. Once disconnected, feed the plugs and wiring loom back through the hole. STEP 6 Now its time to remove the centre console / cubby box. , you have to fiddle it over the 2 gear levers and lift it at the back first, then withdraw it in a rear ward direction. Make sure the handbrake is in the vertical position as well. SEE STEP 7 !!!
STEP 8 Now the console is removed, carefully remove the foam surround from around the 2 gear levers, don't pull to hard as it will tear into small bits
STEP 10 Once the heater ducts are removed, you can then start to drill out the 13 pop rivets that hold the transfer lever mounting plate in position, once they are all drilled you can manoeuvre the plate out of position. It wont come right out as its still got the cable connected underneath
STEP 12 Once those 4 bolts are out, you can then move the lever out of the plate. Note there is no more access required and you don't have to disconnect the Auto cable either
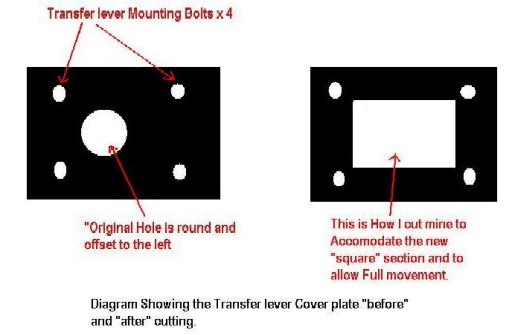
STEP 14 Before you can fit the new lever, you have to "cut" the transfer cover plate to be able to fit the lever in position and so it can move to select diff lock etc Here's a "rough" diagram to show you how big the hole will have to be to accommodate the new lever and its movement left and right as well as fwd and back for "high / Low" gears
Picture to the left shows the new lever installed and the new "cut" in the transfer tunnel cover plate to accommodate the new lever assy
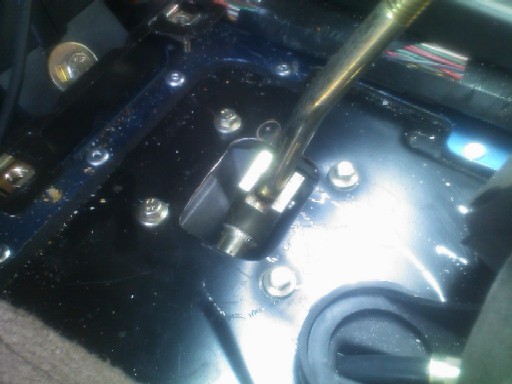
STEP 17 To make life easier, its best to use a long extension to bring your ratchet up above the transmission tunnel as the space is quite limited. I had soaked the bolts for a while with a penetrating oil to help release them but they should come undone easy enough, take care not to knock any dirt etc into the holes.
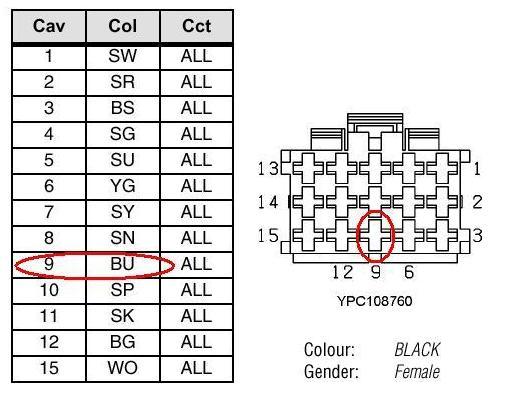
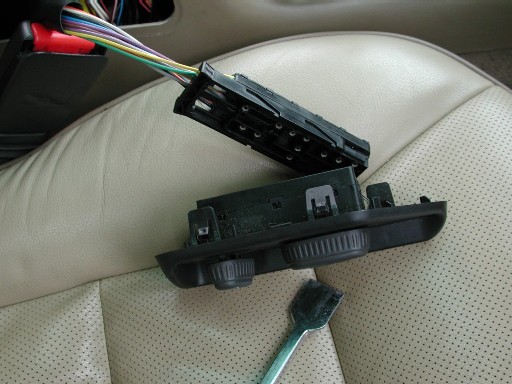
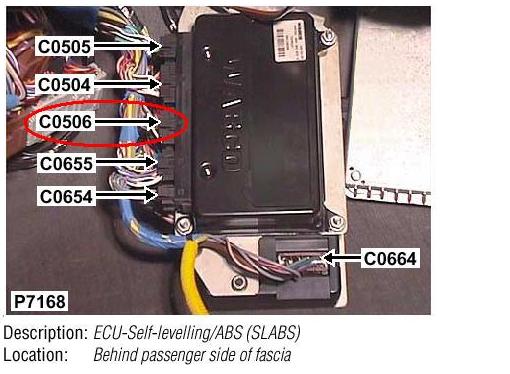
STEP 19 Bolt the new lever back to the mounting plate and ensure the new hole you cut allows the lever to move left and right as well as forward and aft. Its quite difficult to hold the lever while testing to see the diff lock cable move the spigot. If you now move the diff lock lever with the ignition on, you "should" see the diff lock light appear on the instrument panel.. It should only move roughly 45* to the right. If you happy at this point, you could start to refit all the lever / mounting plates etc back together. Don't forget to re-connect the High / low cable as well, and ensure both the locknuts are tight on the diff lock cable adjuster. Before I refitted everything, I did the electrical part of the install to check all is good before I re-fitted the trim etc back in place. STEP 20 NOTE !. This part is NOT needed on Facelift 2003 Discovery 2's as the SLABS ECU was re-programmed to ignore the diff lock input, there fore it does NOT "disable" the ABS, TC and HDC when the diff lock is engaged and the car is started. For earlier models, remove the trim under the glove box. There you will find 2 or 3 ECU's depending on the spec of your vehicle. The SLABS ecu is most likely the centre of the 3, now find the black / blue wire running to pin 9 of the plug, it is the central pin on the lower row, You need to cut this wire and either tape the ends, or as I did fit some "bullet" connectors to enable it to be re-connected at a later date if required. Make sure you have the correct pin / wire BEFORE you cut it. Below is a picture of the SLABS ECU and the connectors. To the left is the pin arrangement of the connector we are interested in, C0506
STEP 22 The rest of the refit is a reverse of the removal procedure.
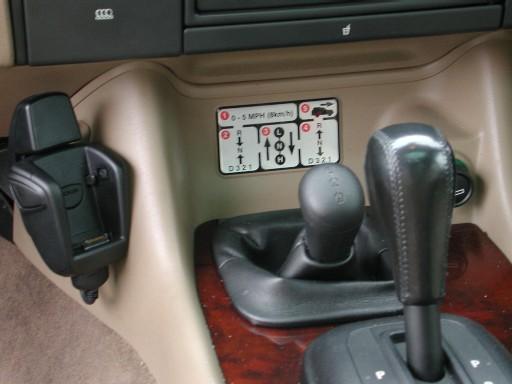
To finish of the install I also wanted to change the warning label that is fitted to the centre console to reflect the fact a Diff lock is there. Here is my original label, however to get the factory Diff lock label seems to be an impossible task !!
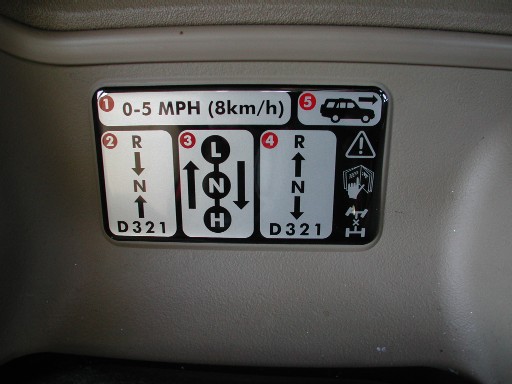
So after my extensive search and help from the dealer, there is an "updated" label available, below is what it now looks like, it seems to combine the early one I originally had, but now it has the standard diff lock image as well and points you to read your owners manual !!!
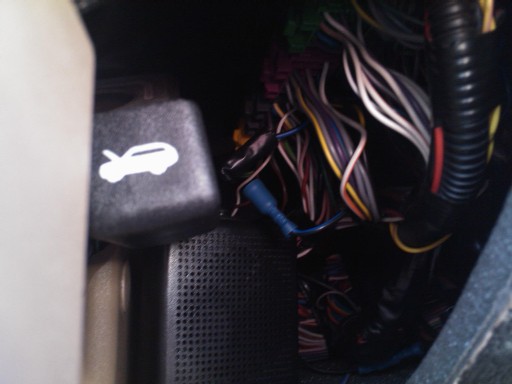
Here you can see the wires that were cut. Earlier in the write you will see the workshop manual says that the connector is Black, well its pretty obvious that's not the case, but the correct wire is in the correct location. I fitted bullet connectors so it can be EASILY re-connected if need be. Some "offroaders" think the TC can be a pain when driving in the sand, so they like to able to turn it off, so another option you "could" do is simply fit a switch inline with these wires, so when the switch is flicked and you start the car with the CDL engaged, your then are without TC if you wish......although if you fit bullet connectors, the wires are easily reachable through the whole in the trim panel (see photos below)
|
||