![]()
|
Factory Satellite Navigation - Installation "guide" |
||||
|
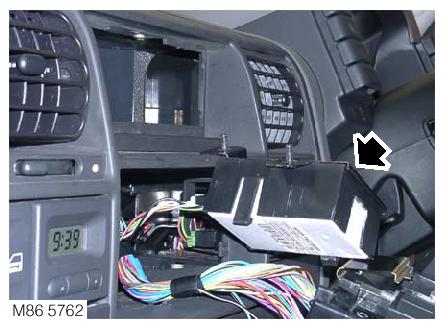
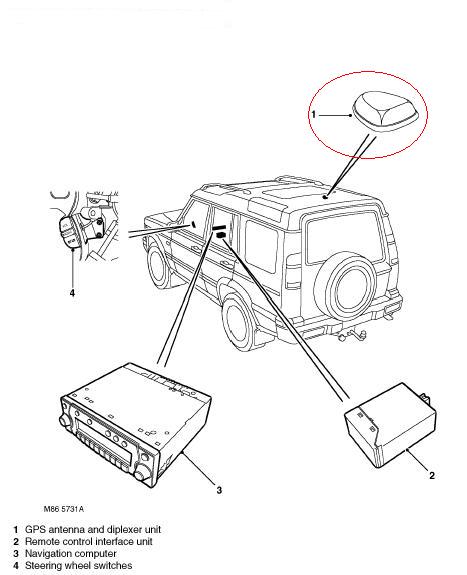
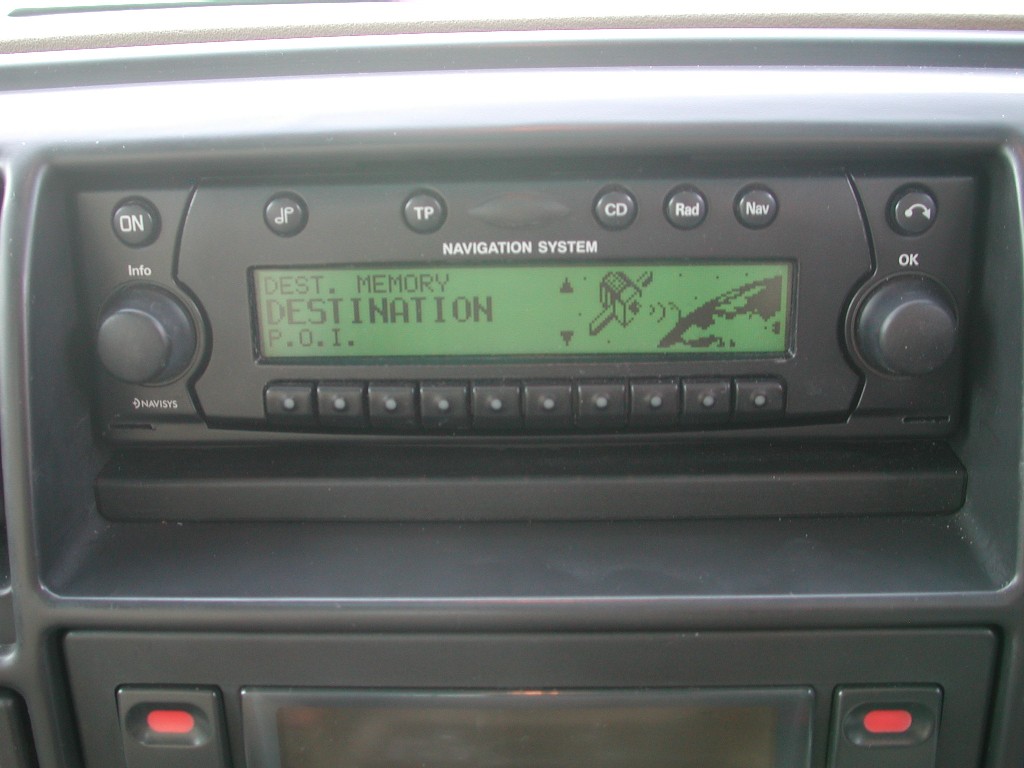
One of the first mods I added was retro fitting the factory navigation system which was an option in the later Discovery 2's and also the same unit that was fitted to the Freelander 1's. Because of the limited space "in dash" in both the Freelander and Discovery, Land Rover never actually designed a system with the model, they chose to incorporate a "ready made" DIN sized unit. They used the same unit that was available to Mercedes, BMW and Porsche, this being the Harmon Kardon "Traffic Pro". Its actually badged as a Becker Unit, but they are all the same but just carry different names. If you were to buy this unit for another car for aftermarket installation, it would be labelled on the Front as Becker traffic Pro, when fitted to the Land Rover models you can see its labelled just as Navigation System, however the units are identical in function and appearance. I did a LOT of research into fitting this unit, and there is quite a few websites out there with good information on wiring etc. Installation of the unit itself is very straight forward after removing the Factory Alpine head unit. All that needs to be added is the small "finisher" you can see below the unit in the picture below as the factory Alpine is contoured with the front of the dash . Wiring up the unit to the existing harness is where the challenge begins. Several websites stated that it wasn't really practical to try and add it to a Disco 2, this i took as a challenge and was determined to get it working as it would if it was factory installed. NOTE !! I did this on a 5 seat Discovery2 with NO rear Audio, so any connections to that part of the system has not been researched and is NOT covered here...... The plugs on the existing loom will fit the Becker unit, however a few have to be added or changed position. The Nav Unit requires a speed signal to be added to help the GPS system calculate time and distance travelled. There is a speed signal already present at the SLABS ECU, but it gives the signal in the wrong format for the Becker unit to use, so another had to be found elsewhere. I finally connected into the speed wire that goes to dash under the interior fuse box. Open the interior quick release panel where the fusebox is, In there you will find a large GREEN connector with a "built in" lever to remove it. In that loom / plug there is a PINK and GREEN wire that you need to splice into. That is the correct VSS to use. The pin outs on the Headunit are labelled on it, so its relatively straight forward to add it. Also required is a signal + 12v from the reverse circuit so the Nav system knows if your going backwards. that was easy enough to trace the wire to the reverse lights, splice into that and wire it back up to the head unit. The speaker connections are identical to the Alpine, so that is just plug and play, as are the power connections. The most important function not to loose for me, was the steering wheel controls. The factory Alpine unit was wired directly to the switches on the steering wheel as it was compatible with I-bus messages, the Becker unit though isn't as it is sold as an "aftermarket" unit as well, so its not possible to connect it as the Alpine unit is. This is where Land Rover designed and "interface" to go between the steering wheel switches, to convert the signals into a serial comms link that the Becker unit can use. this interface unit is also in the Freelander and must be purchased to complete the install, it retails at around £57.
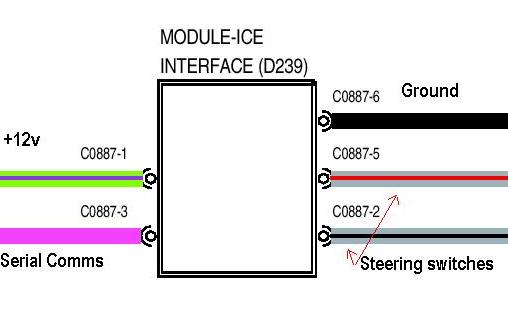
It is loctaed behind the Aircon panel below the head unit and is screwed to an additional bracket that fits the to dash support. This bracket is not a nessecity as the interface can simply be tie-wrapped to the support structure .Land Rover Part number Of the "interface" is YWQ100031L There is 5 wires connected to the unit, 2 from the steering wheel switches and a ground, a + 12v Ignition supply and the serial communications wire. Cars not fitted with Nav from the factory do NOT have this loom at all, and it must be made up and wired in. the unit has a 6 pin plug which is not possible to buy, so I had to come up with another way of connecting it up as the pins are even to small to solder on to. I will explain how I did this in the next section. Obviously a GPS system needs an antenna as well. The factory Disco 2 antenna is located at the rear of the roof, vehicles after late 2001 (51) plate may actually have a bung already fitted to centre of the rear roof (in case you wondered "what goes there" ? ).
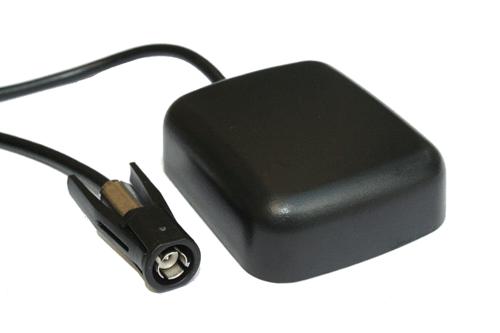
Mine did not have this bung, but it would be simple enough to drill a hole and fit the antenna and this is what I intended to do. But after many weeks of waiting, 100's of phone calls to dealers all over the country, and conversations directly with Land Rover UK, I found that this antenna was no longer available, and I had already purchased the antenna loom for the Discovery as this IS available. I searched hundreds of websites to try and find a GPS antenna that was a as close to the factory look as possible, there is a few out there, but most don't have the correct connections and that would have added more headache to the install, so...... I looked into a temporary idea and purchased a dash mounted antenna. The Becker Unit requires what is called a "wiclic" plug for the GPS antenna. Below is what it looks like, I got this one from ebay for only £15
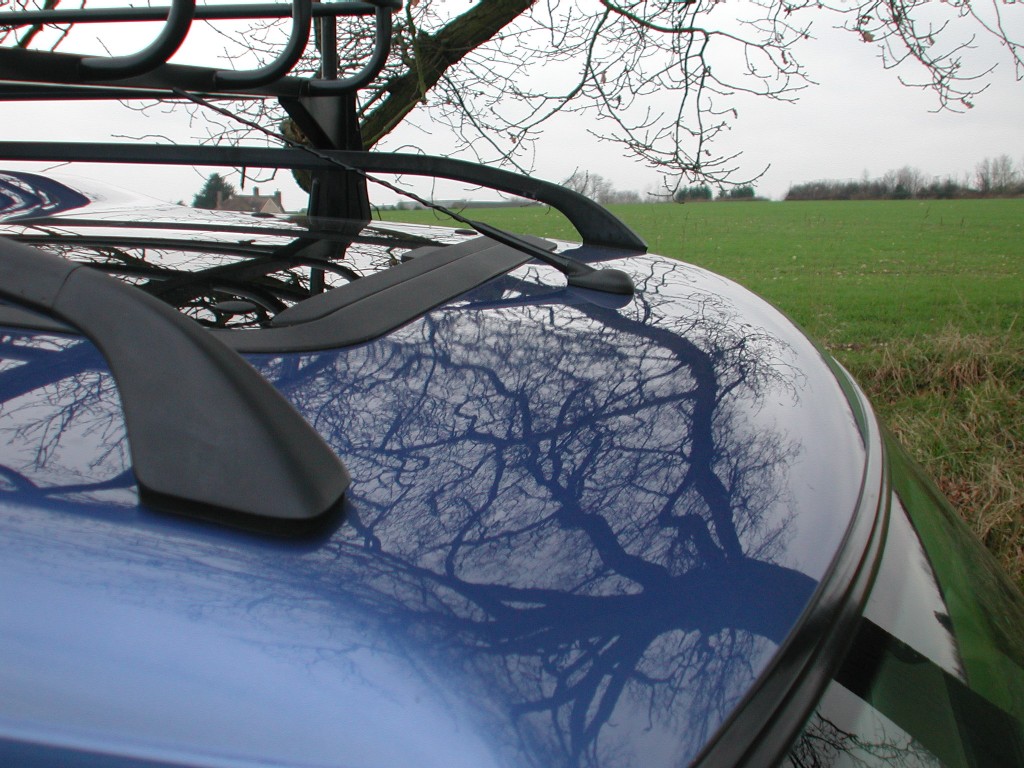
This antenna did work very well, and is simple enough to get it to sit on the dash with a sticky pad and the wire go down behind where the windscreen is and up to the head unit. GPS antennas must have a clear view directly upwards to work at their best. This is the cheapest and easiest option if you don't want to drill your roof etc and will work 100% with the Becker unit. I ran this for several weeks with a working system and it performed very well, all I still had to do was connect up the steering wheel switches and the CD changer, but I really wanted a roof antenna and so came up with another idea... The Freelander has the same system, but uses a combined GPS / Radio antenna in the "whip" style. This is readily available at the dealers and is approx £50 for the base and whip. This antenna obviously requires you to drill your roof to fit it, it fits at the front of the roof on the Freelander and this is the best option for the Discovery as well. This is where I fitted it, it requires 2 small holes drilling and is held in place by the connections underneath. this it what it looks like fitted on my Discovery2. It actually looks really good in my opinion and is exactly the same angle as the sunroofs when they are open and does not actually increase the height that much either, even it was to "catch" something, its flexible and will just flex out the way..... The ideal spot for it, is unfortunately where there is a roof strengthening web underneath, but a small amount of cutting and it can easily be placed there.
The fitting of this antenna, did actually help and hinder at the same time. the Discovery GPS loom is available as a separate item, how ever the Freelander one isn't, and the connections to the GPS antenna are different and once again a real funky looking fitment that you just would not be able to buy. This gave me no option but to buy the whole Freelander roof harness which included the radio and GPS looms. After buying that, I split the loom down to the parts is needed just for the Radio and GPS, Wiring those down the "A" pillar and up to to the Head unit is very straightforward. The Radio aerial connections are the same for both the Freelander and Discovery. The Discovery has 2 amplified antennas built into the rear side windows, these will not be used as the Freelander antenna also does radio, and because its roof mounted and not in the screens, it really does not need any amplification, and consequently out performs the old ones anyway. So now I had a externally mounted, working (very well) GPS and radio antenna, all I still had to do was get the steering wheel switches to work and the CD changer up and running. As I mentioned earlier, the connections to the remote interface unit were very small and unavailable to buy, but after purchasing the Freelander roof harness, it also had loads of additional plugs on it that I would not need, but 2 of them fitted the interface unit almost perfectly. So after cutting these of the loom and adding suitable lengths of wire, I was now able to wire up the steering wheel switches to the interface unit and then on to the head unit. To work out what connects to where, you WILL need the factory wiring diagrams from a 2003 "export" model as for some strange reason, the interface wiring is not included in the UK spec diagrams, just another strange Land Rover thing !!. Below is the pin out connections of the remote interface unit.
Ok, now the CD changer issues. The "high" line factory system uses an Alpine Cd changer, part number XQE100240. The Becker unit is also fitted with and Alpine changer but it has a different part no XQE100120. I knew this before I did the install and after reading all the wiring diagrams it soon became clear that my existing changer would probably not work. Although it uses the same loom in both setups, the pin arrangement is different, and in particular the audio side. The standard unit has a + and - for both left and right audio out, but the changer that goes with the Sat nav unit, has a "common" - for the Audio connections. With this in mind and the fact I really wanted to retain the CD changer, I took the plunge and re-wired my factory CD loom to how the Sat nav changer is wired, with a common Audio ground, and it worked. The CD changer was recognised by the Head unit and would control it in every way a factory install would, but....always a but !!..there was a small amount of "alternator" noise or interference while the engine was running, and when the changer swapped to another disc, you could hear what was going on through the speakers. To try an fix this issue I added and Additional earth from the changer straight to the chassis as the loom is earthed via the head unit, this how ever didn't completely fix the issue. There maybe a way to fix it permanently, therefore you would not need "another" CD changer, I did do a little web searching to try and find a fix, but because it worked ok, I lived with it until I was luck enough to get the correct one This "noise" I can only assume is something to do with the common ground used for the audio connections because I recently purchased the "correct" changer, simply plugged it in and its 100% perfect !!, note this is not simply plug and play, you still have to re-arrange some of the other pins on the factory cd loom, this includes the serial comms wire that in the standard setup goes directly to the head unit, but with the Nav system it runs via the remote module interface (above) Below is the 2 wiring diagrams for the different CD changers, first the standard "high line" system
And below is the factory satellite navigation system, you can also see how the remote interface module is connected to the cd changer and the steering wheel remote switches mentioned earlier.
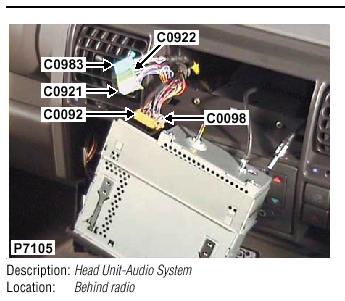
Also the connectors are different at the head unit end to. With the high line system they are all in 1 plug, C1354, however with the sat nav install they are split between 2, C0983 and C0922, this is where you need to re-pin the existing plugs or make your own plugs up. This was something else I had to overcome, as I wanted to leave the standard plugs there, so if for any reason I ever wanted to re-fit the standard factory Alpine setup I could simply unplug one and plug in the other. After more studying of the wiring diagrams and the official electrical library, it became clear that the plug labelled as C1354 on the High line system, was actually called something else on the Sat nav system, confused yet ?.....I was to, but after using the wiring manual, and the actual sticker on the Head unit itself, it was fairly straight forward to work out exactly what went where.
High line system plugs (head unit)
As you can see by the picture above, C0983 is the same connector ! So the existing plugs C1354 and C0922 were disconnected and I made my own loom with identical connectors which can be purchased from "good" stereo accessory shops. NOTE !! As I stated earlier I did this install on a "5" seat Discovery with NO rear Audio, the connector C0922 on the High line install is where the rear headphone modules are wired in, hence I simply disconnected these as I did not need them. The connectors are officially called "mini iso's". This link takes you to where you can buy the correct colours and pins to make your own loom. Mini ISO connectors. Its then simply a case of buying some different coloured wire to make your loom. I used some of the "waste" wire from the Freelander roof harness I had bought as it contained wires of the correct colours, so I could keep it as factory as possible.
|
||||