![]()
|
Workshop :- Prop shaft Overhaul. * UPDATED - Centre Bearing Replaced !! 06/09/2008 |
||||
|
|
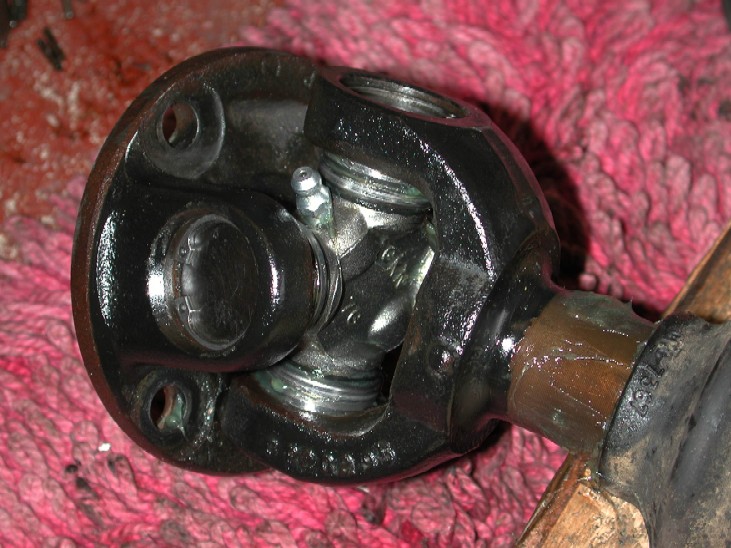
Due to the amount of e-mails I get ref where I got the centering bearing and the UJ's, I have now added the info to the bottom of the page :- Preventative maintenance is always a good idea, especially on items that can be changed for not a lot of money. The propshafts on the Discovery contain Universal joints that over time and ever increasing mileage can wear out due to lack of greasing during a cars life. The rear prop shaft on the Discovery 2 has 1 "Greasable" Universal joint at the transfer case end, and a flexible doughnut (rotoflex) coupling at the rear Differential which is a "throw away" item if it needs replacing. The Front shaft on the Discovery 2 has a single "Greasable" Universal joint at the front differential (below)
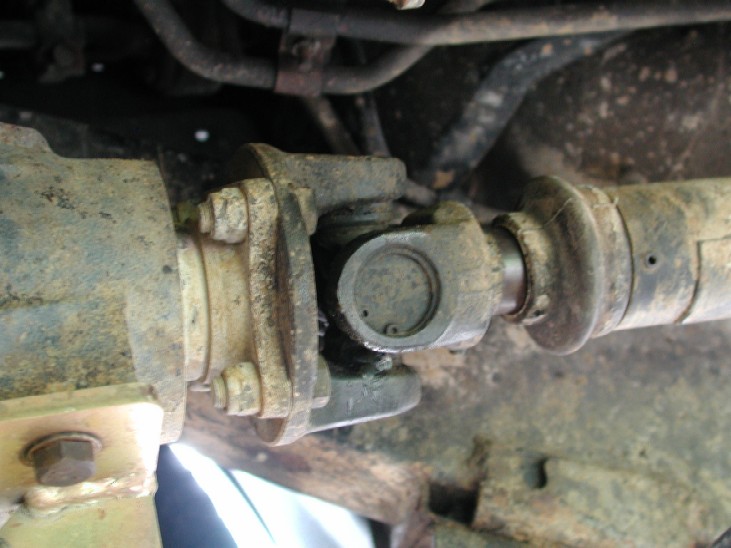
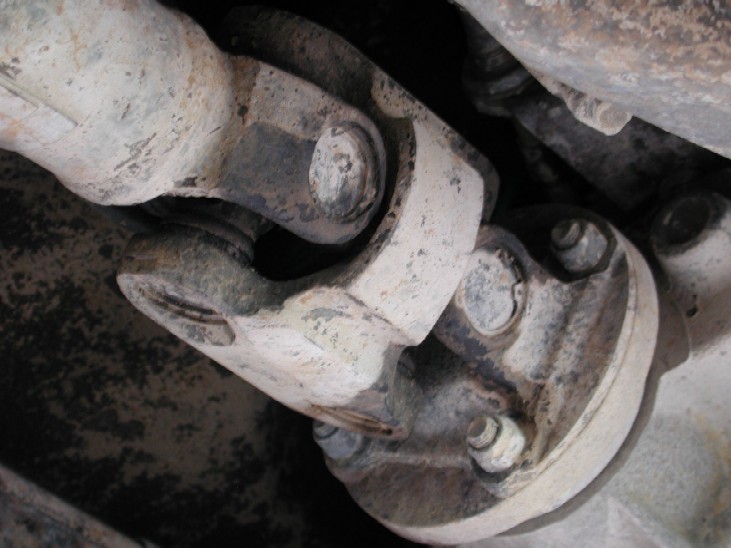
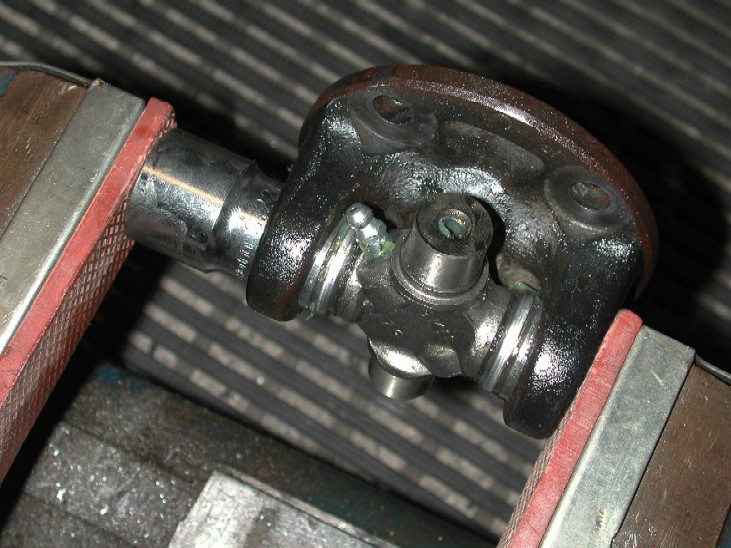
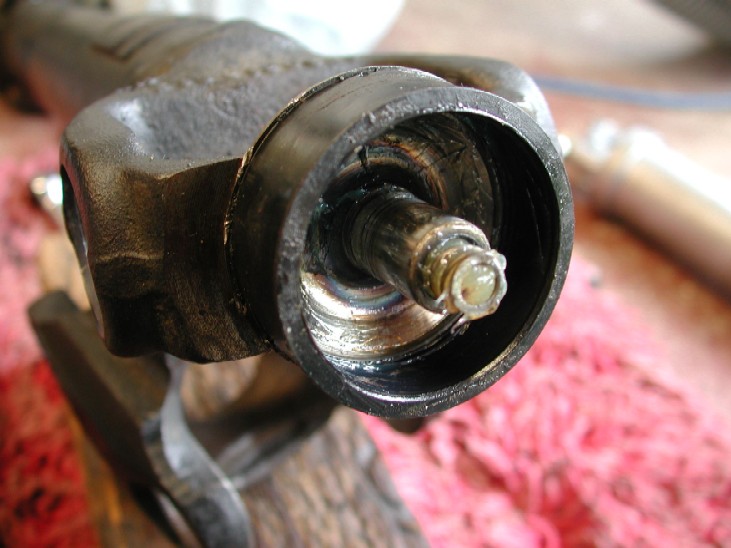
but a "double cardon" or "Hookes" joint at the transfer case end, this joint amazingly is fitted from the factory with non-greasable Universal joints, a simply crazy idea !!
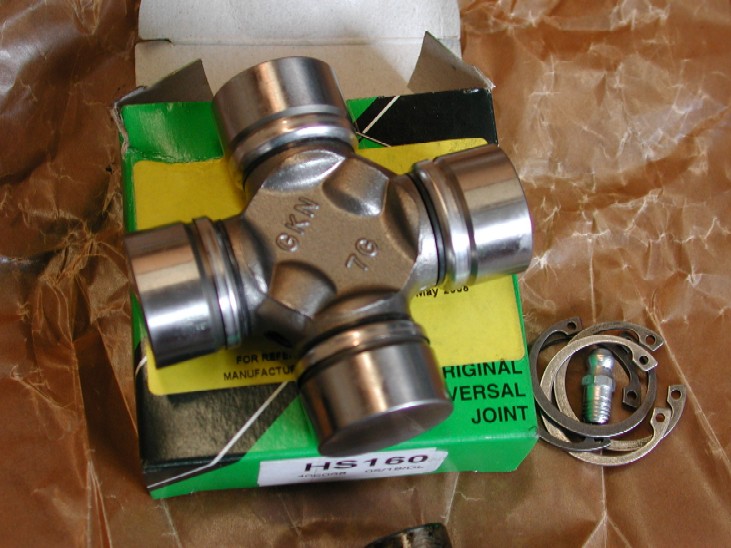
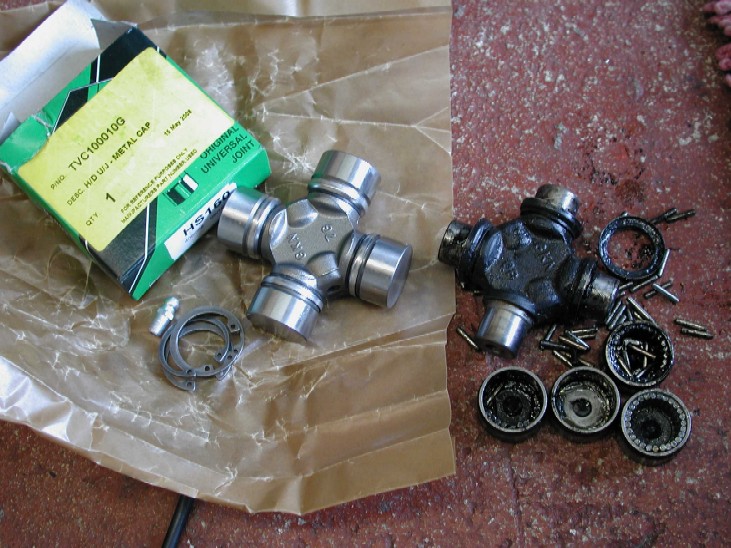
Above is the "Hookes" joint at the transfer case end, with some very dry looking UJ's !! Many Discovery 2's have done big mileages without any issues, but these "double cardon" joints are known to fail, and when they do they can cause severe damage to other parts of the car including the transfer case. It obviously depends on what speed etc the vehicle was doing at the failure time, but the fact I have seen evidence of them failing prompted me to get mine rebuilt asap. The propshafts are made by GKN in the UK, so with this in mind I bought some GKN heavy duty "greasable" joints to replace the ones already on the car, plus 2 extra to rebuild the double cardon joint with greasable UJ's to. Like everything else Land Rover, you can get stuff from loads of places, and you can get replacement UJ's for a fraction of what I paid for mine, on EBay for example,, how ever with something so important, I decided to buy the "known" name. Below is one of the 4 nice new Universal Joints I bought for this job, these are actually "heavy duty" ones with a slightly larger bearing contact area, and off course they are greasable to.
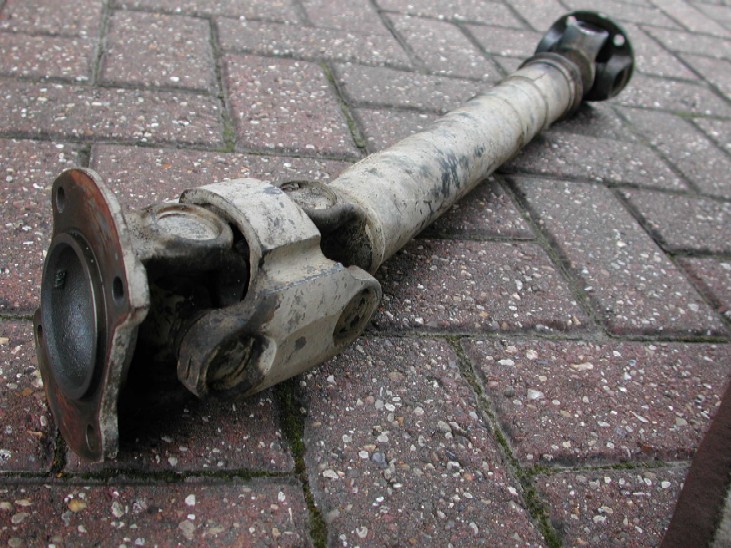
The Universal joint comes with a grease nipple to fit upon installation and 4 new circlips as well. So to start off you need to remove the prop shaft your going to do, I had at the time of writing this "how to" already done the rear shaft UJ, but its exactly the same fitment as the front shaft is. NOTE !!!. IT IS MOST IMPORTANT AND STRONGLY RECOMMENDED !!! THAT YOU IN SOME WAY MARK THE PROP SHAFT IN RELATION TO THE FLANGES ON THE DIFFERENTIALS AND THE TRANSFER CASE SO YOU CAN REFIT THE PROP SHAFT BACK IN IT'S ORIGINAL POSITION, THIS WILL HOPEFULLY ELIMINATE ANY POSSIBILITY OF DRIVE TRAIN VIBRATION ON RE-ASSEMBLY. I used just a small file and made several marks in different positions to help me get it back in exactly the same position. Using a marker pen or felt tip is probably not going to be that good as it will get wiped / washed of with grease, or WD40 etc when you mess wit the shaft whilst changing universal joints. So, to remove the front shaft, simply undo the 4 nuts and bolts at either end of the shaft, and it will simply come away. The bolts / nuts are either 14mm or better still 9/16 AF. Below the front shaft is removed from the car.
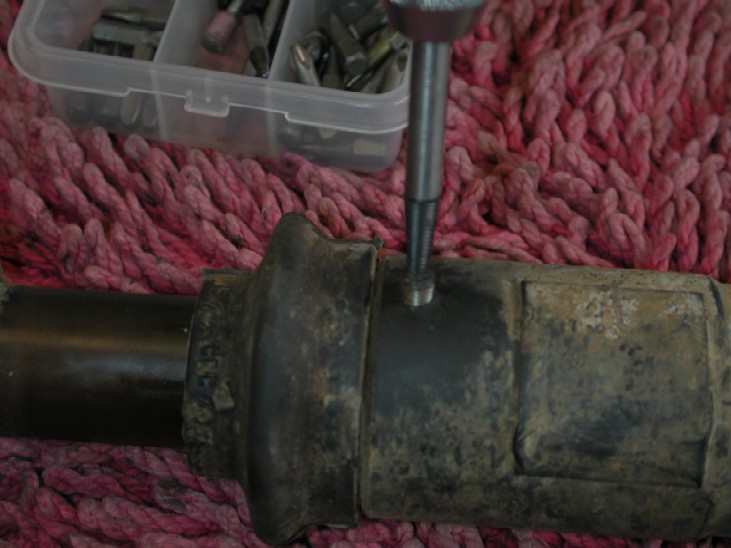
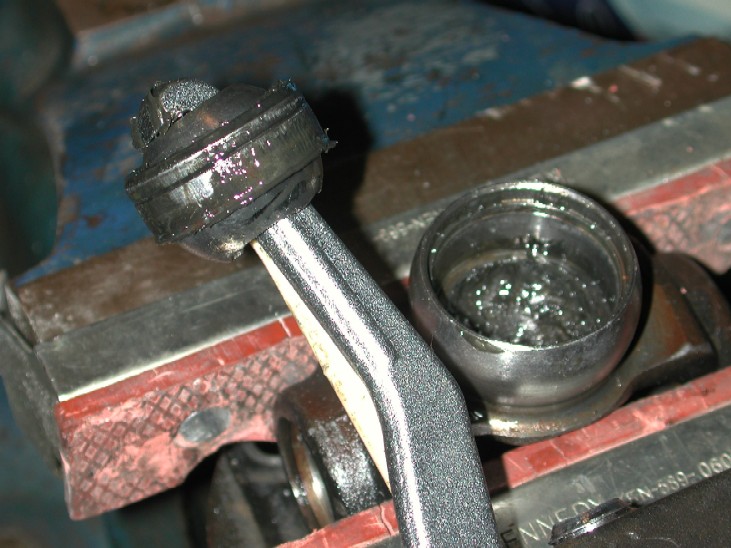
As well as the greasable UJ's, both the front and rear prop shafts have a sliding splined section that also has a grease point. The "official" way is to remove a blank, screw in a grease nipple, grease the shaft then refit the blank again on the front shaft. The rear prop shaft you will find probably has the nipple left in place. To remove the "blank" I used a screw extractor to wind it out, it should not be tight to remove.
You can do this after the rebuild or before, does not really matter, I just gave it a really good greasing whilst it was of the car and easier to get to. Once you have greased it, remove the nipple and refit the blanking plug. Next is the renewal of the UJ's themselves. The procedure is the same for both the front and rear shaft, and the single and double cardon joint. First of remove the circlips, these are very springy, so some eye protection can be advisable as they can "ping" off at quite a rate !!. There is 4 circlips on each UJ, one on each bearing cap.
If they have been in there a long time, it might help to give the ends of the circlips a tap with a hammer and punch to loosen any crusty dirt / corrosion. So use some circlip pliers and carefully remove all 4. Now because of the way you have to move the joint out of the yokes, the grease nipple can be in the way, so use a socket and ratchet and unscrew the grease nipple. This is only relevant on the rear shaft UJ and the forward end of the front prop shaft.
Now its time to get the UJ out of the 2 yokes, there is several ways you could do it, the workshop manual tells you to tap the yokes to get the bearing caps moving. This worked a treat on the UJ's that had grease nipples from the factory
You will need to tap it enough so the bearing cap can be removed, some will probably be a LOT stiffer than others, they just need more work to remove them !!. Repeat the process on all 4 caps until you can get the UJ out of the 2 yokes. Be careful not to hit / damage the yokes at all. Once its out, clean all the surfaces ready for the new universal joint. Below is the old joint removed and the bearing caps are shown with the tiny needle rollers inside.
Refitting is the reverse of the removal procedure, BUT because you have to remove the bearing caps to get the UJ in between the 2 yokes, be very careful NOT to loose any of the needle rollers. Its a good idea to smear some grease inside the caps to help keep them in position. Fit the new UJ into position in one of the 2 yokes and fit 2 bearing caps opposite each other first. You can use a small hammer to tap them into position carefully. Once 2 of them are lined up, if they move quite easily you could tap them all the way in until you can see the recess for the circlip. DO NOT tap them to far as you can damage the bearing cap seals. If your unsure, keep trial fitting the circlip until it sits properly in its recess. Another way to fit the caps is use a socket and a vice. I had to do this on the double cardon joint as they would have required to much of a "wack" with a hammer to fit them. With a vice and correct size socket you can apply an even, constant force and they will go in easier.
Once 2 caps are fitted and the circlips are installed, you can then fit the yoke to the shaft, or vice versa and repeat the procedure for the other 2 bearing caps. Once they are all in, fit the grease nipple and give the joint a good greasing !!
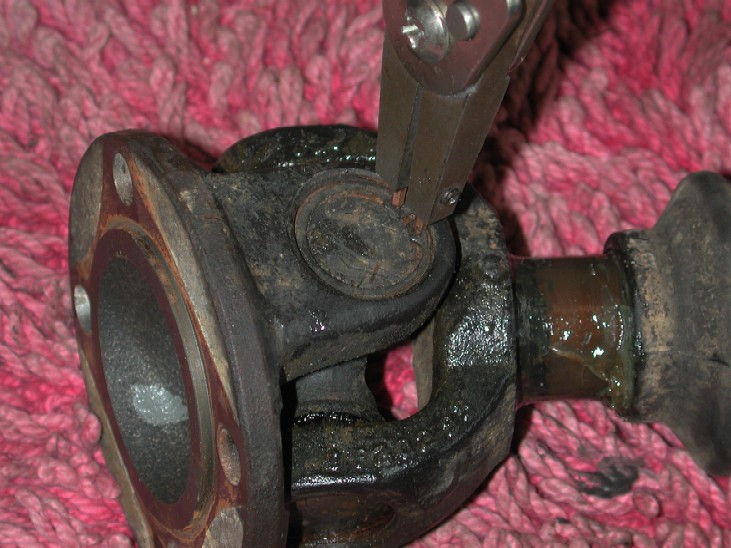
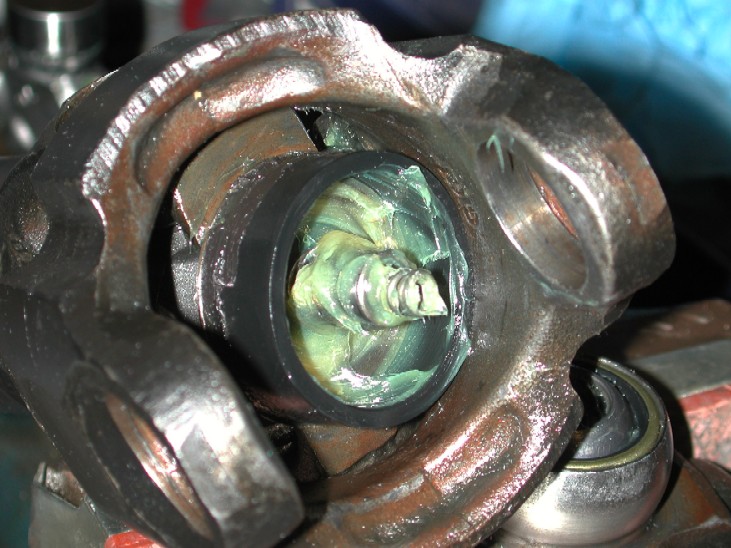
Check the joint moves in all directions smoothly, it should feel nice and smooth and probably a little tighter then the original ones. The procedure above is identical for the rear shaft UJ's and the Double cardon joint. The double cardon or "hookes" joint is a little more fiddly as you have to UJ's to do. Again remove the circlips first, then I remove the end Yoke from the shaft then the rest of the joint. Tapping the yokes with a hammer, and even a direct hit on the bearing caps with a large punch and mallet really would not move the caps at all, so I resorted to the socket and vice method I used earlier. This and some grunts and groans eventually pushed the UJ caps out. The double UJ also contains a centering bearing that sits on the end of the shaft and is there to keep a constant distance / angle between the 2 UJ's as they move at different angles. I found it very hard to locate a new bearing for this, and even talking direct GKN proved unhelpful as they will only sell you a complete shaft!!! ***NOTE!!!, when you pull the joint apart, there is a spring and needle rollers in the centering bearing, be very careful not to loose them !!!***
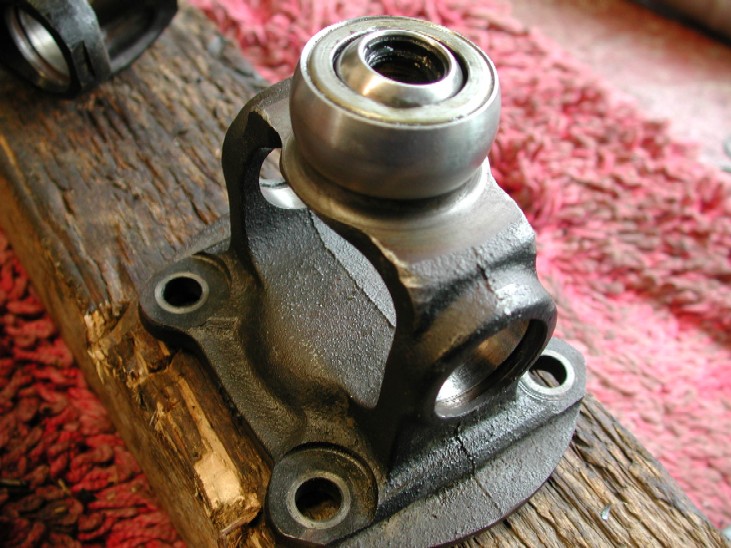
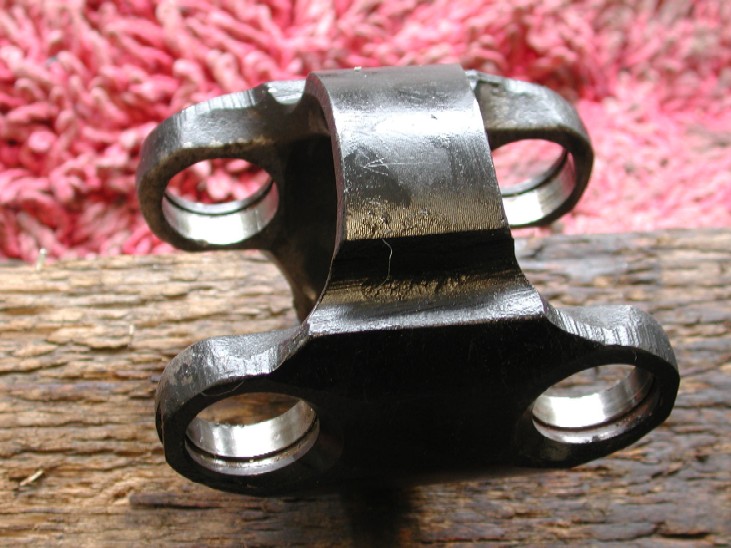
Here is the centering bearing on the shaft yoke, it also contains tiny needle roller bearings. After having a good look at the bearing and "feeling" it move in all directions, it was actually in very good condition, so I chose not to remove it. I cleaned it out of all the old black dirty grease and then re-packed it with some fresh new grease. The shaft has a dust seal / cap that the centering bearing moves around in, this was also inspected, cleaned and re-greased ready for re-assembly. You can also see the spring in the end of the shaft.
Clean all the bearing cap apertures etc before re assembly
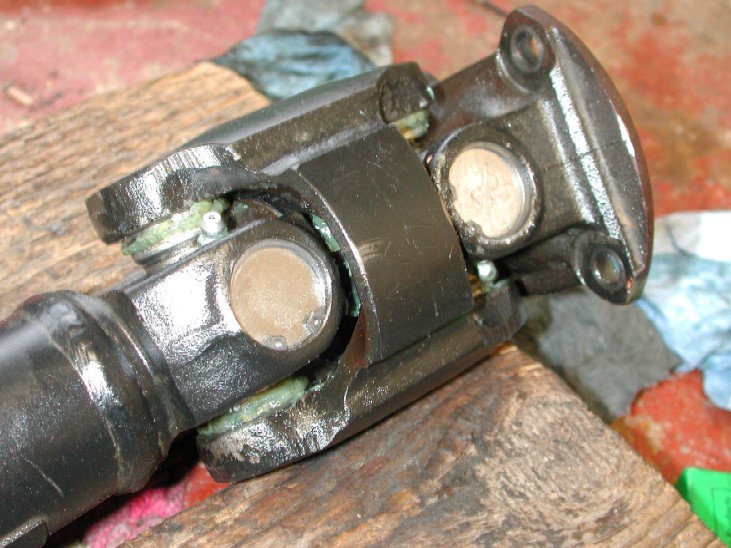
Because the is primarily a preventative task, and due to the fact I had no "issues" with my prop shaft before removal, I fully intended to re-use it, although, the shaft did show some "polishing" on its surface, how ever I felt this was minimal and continued to rebuild it. "If" you find significant wear in this location, then it may be time to get a new shaft. Refit the UJ's in the same way as before, 2 opposite each other, then fit the joint pieces back together. Its a little more fiddly than a single UJ as you have 2 sets of angles to fiddle with to connect it all up. WHEN RE-BUILDING REMEMBER TO BE CAREFUL THAT THE NEEDLE ROLLERS IN THE CENTERING BEARING, AND THE SPRING IN THE END OF THE SHAFT GO BACK INTO THEIR CORRECT POSITIONS !!! Because the new joints contain grease nipples, that small additional weight "could" imbalance the shaft, so I fitted them slightly opposite to each other and 180* to the other end to "hopefully" counteract any additional weight that might put the shaft out of balance. If you refit the shaft and its really out of balance, you could simply take it to a prop shaft overhaul shop and have it re-balanced to compensate for the new joints. So far mine has been ok and is no different to as it was before the rebuild. Here below is the double cardon joint re-built with greasble UJ's !! as it "should" have been from the factory!!, Now give the joints a good greasing !!!
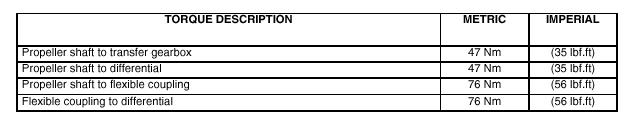
Now refit the prop shaft back to the car in its "original" position which you marked before removal, and tighten all the nuts and bolts to the specified torque figures below
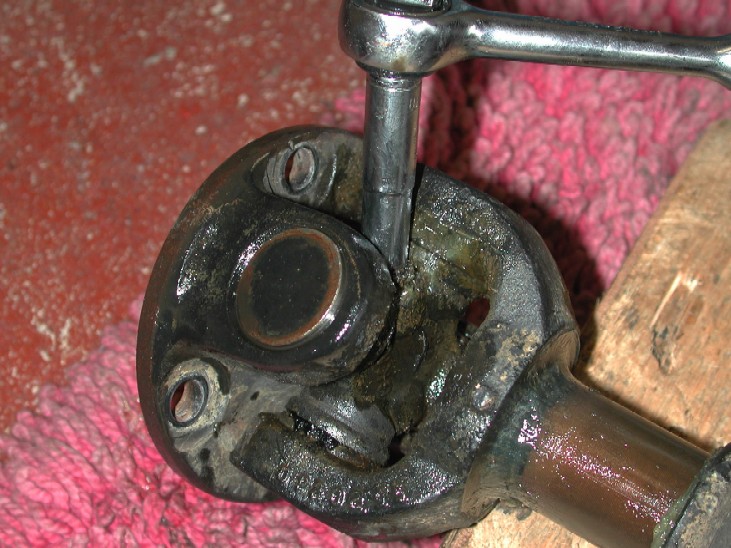
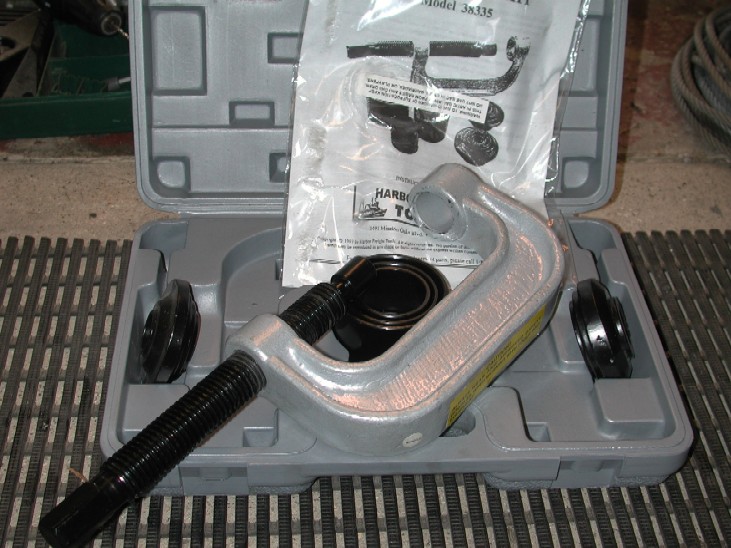
* Update Below * OK, previously in this article, I did not replace the centering bearing in the "hookes" joint" as 1> I found it hard to locate the correct bearing, and 2> I was unsure of how I was going to remove it with out a big fight!! After some more research and shopping !! :o) I now had the correct bearing to replace it with, and some new tools to assist me in the job. When I first removed the UJ's in the propshaft the greasable joints came apart easily, but the "dry" sealed ones in the "hookes" joint needed some more aggression to get them out. Now because I was going to remove the new UJ's again, I wanted some way of doing it without causing any possible damage to them. So after some more cross Atlantic shopping I bought a tool designed to remove UJ's.
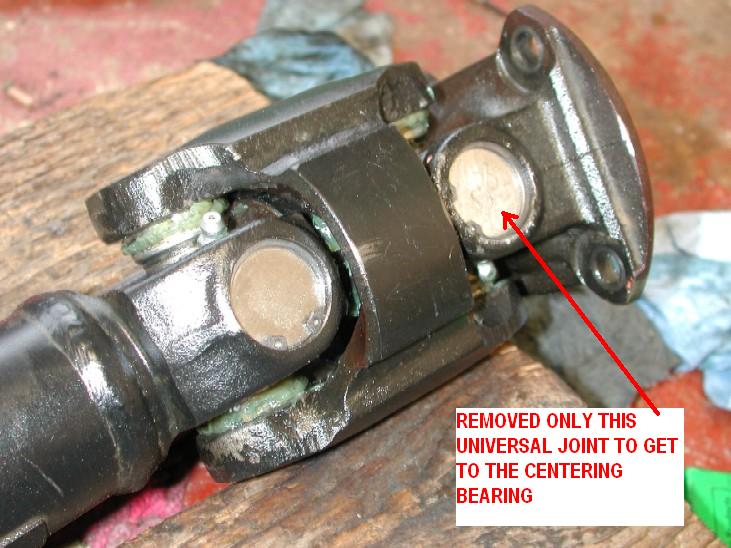
This made removing the UJ's a breeze and the new joints were back out again in no time!!!! and without using a hammer. This time I was very careful to make sure I kept all the needle rollers etc from the UJ bearing caps as I was going to re-use them as they had only been fitted for a few weeks This time I only needed to remove the end UJ to get to the centering bearing.
So, now the UJ was out it was time to tackle the centering bearing. First of just "pick" out all the small needle rollers from inside the bearing, then at the bottom is a small washer, just use a small tool to remove this.
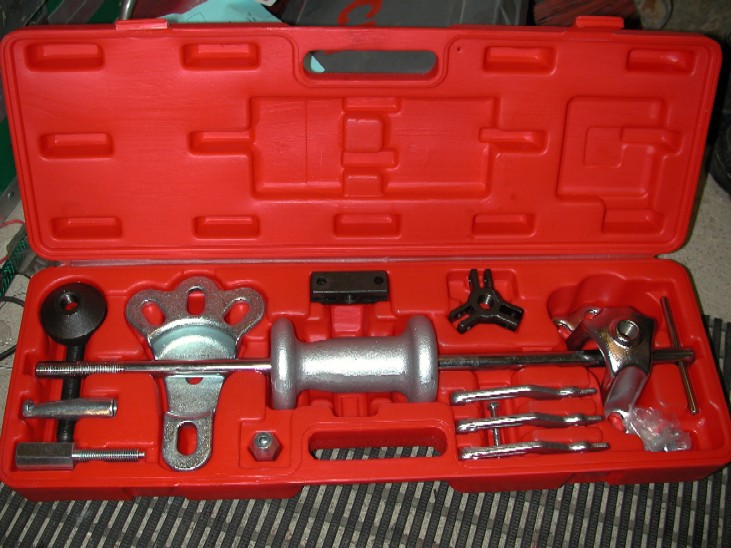
Once that was all done, it was time to tackle the bearing itself, again after purchasing another tool it was time to put it to the test
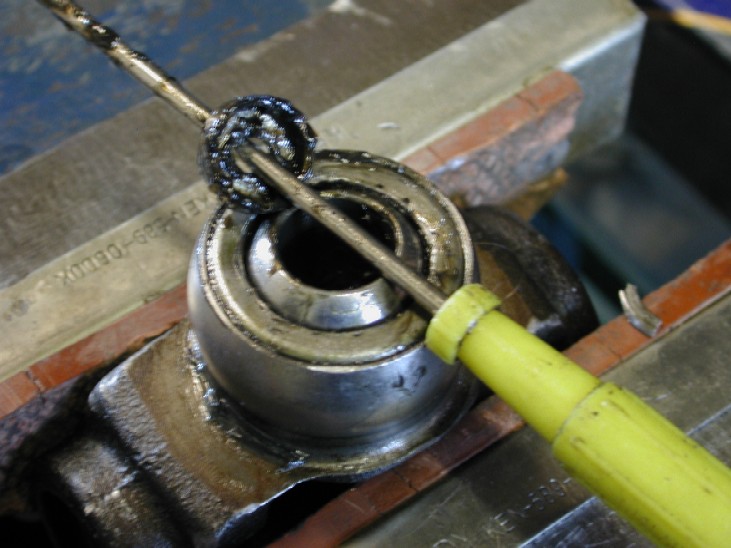
Above is a slide hammer kit I bought to do this job (any excuse hey!!), it comes with lots of attachments and will be useful for lots of jobs in the future as well, from bearings to hubs to flanges etc etc. It also includes some internal pulling lugs that will actually fit inside the centering bearing and provide a way of removing it. So what I did was rig up one pulling leg onto the hammer, hold the prop yoke in a vice, then insert the slide hammer into the bearing and also a screwdriver to "pack" it out tight.
I was fully prepared for a big fight, but was amazed that after just 3 small wallops with the hammer the bearing was out !! :o)
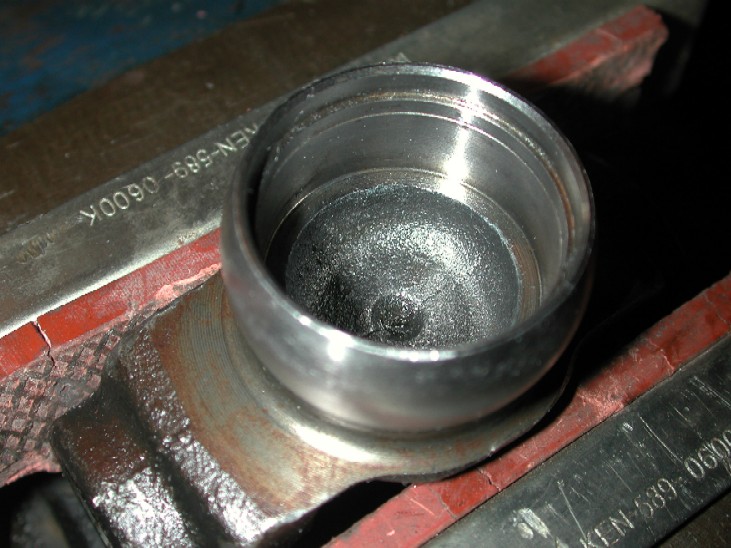
The tool made it so easy that it was a VERY worth while purchase !! I then cleaned all the old grease from the bearing housing in the prop yoke, and re-packed it with new grease ready for the new bearing. I filled up the "un-machined" area you can see below with new grease.
And on the other end of the shaft where the centering shaft goes, then I re-greased it ready for re-assembly and fitted the new spring into the hole.
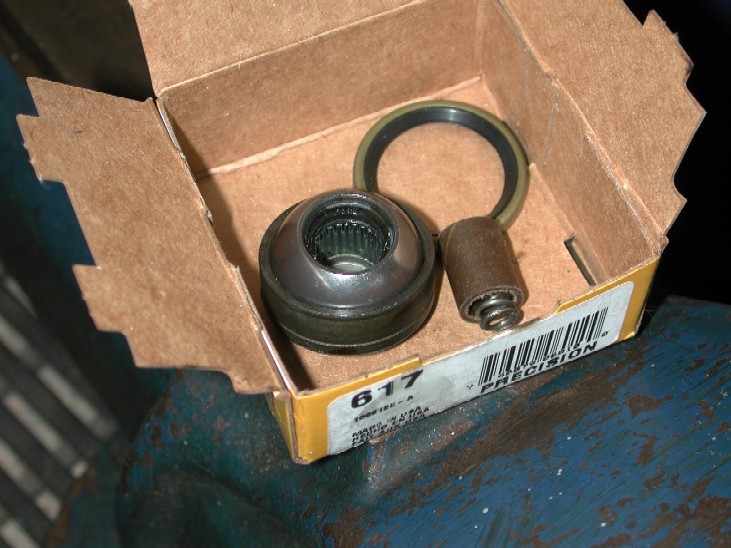
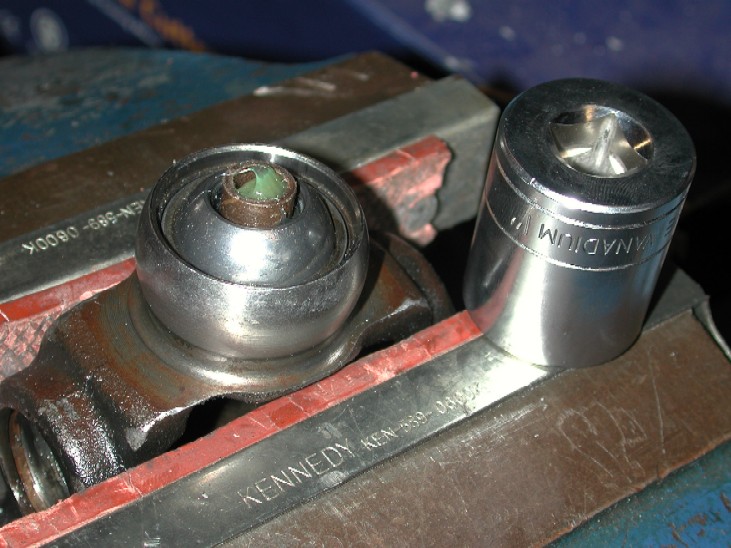
Here is the new bearing, it comes with a new dust seal and also a spring for the end of the shaft. It comes with a small cardboard tube inside it to keep all the needle rollers in place.
Now to re-fit the new bearing I used a 1" socket. It actually fits perfectly over the bearing and inside the bearing housing of the yoke. After a little help with a hammer, the new bearing was driven into place.
I again used the socket to fit the dust seal "carefully" and then packed it full with new grease.
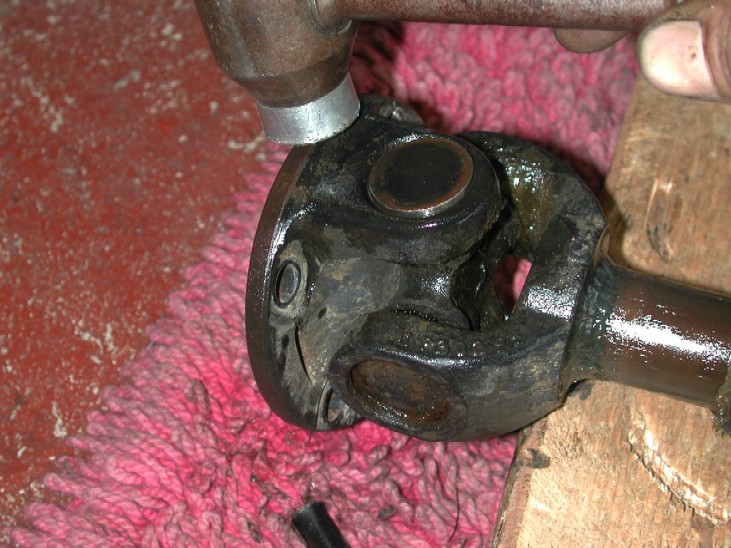
NOTE :- At ALL times you are messing with the bearing, pay constant attention to the needle rollers and make sure they ALL stay in place. It was not until I had "felt" the new bearing installed that it was much "tighter" than the original one I had left in place, so I do now think its worth while changing it if you intend to overhaul the shaft. That's it, new bearing fitted. Now I re-assembled the shaft as before making sure the spring etc in the end of the shaft remains in position and that I installed the yoke into the shaft, being careful not to disturb the tiny needle rollers in the new bearing. I found its far easier to install the yoke back into the double cardan joint with the UJ body only. I then refit the UJ bearing cups 1 at a time making sure they fit central over each UJ spigot before tapping them home into place, and refitting the circlips. Once its all back together, give the UJ's a good greasing and refit back to the car
Shaft fully rebuilt again with new centering bearing, re-greased and ready for fitment back to the car. Centering bearing (Europe and USA) I found it very difficult to get any definitive answer from UK companies ref the centering bearing, and most of them "if" they could supply one, wanted around £50 !!. So I looked elsewhere. The centering bearing I used I got from www.rockauto.com which is in the U.S. Price was great and they shipped VERY quickly. The PART No You require is a Precision 617. Use their part number search to locate it on their website. It does not list it for a Discovery 2, but be assured it is the correct bearing, obviously being in the US the exchange rate can affect the cost, however the fact I could get one made it a def purchase. (Australia) Its seems as with the US, its easier to locate a part in AUS than over here. The bearing part Number widely used over in AUS is :- Hardy Spicer SCV-082B (cannot supply link, but Google is your friend ;o) (USA) Neapco 7-0081NG. Propshaft UJ's (UK / Europe) These are far more easier to obtain almost anywhere, In the UK I got mine from here :- http://shop.dingocroft.co.uk/acatalog/Propshafts.html I used the Genuine GKN Heavy Duty UJ's Part No TVC100010 (Australia) Hardy Spicer K5-a747 1300 series heavy duty UJ's (USA) Neapco 1-0005, Precision 344 |
|||