![]()
|
Spot Lights or Driving Lamps * RECENT UPDATE ! |
||||
|
|
My Disco as you have seen in the
other page has some spot light mounting points on the A bar, when I got
the car there was no spots fitted, however after a little look underneath
the front I noticed a couple of wires hanging around that looked like they
had been cut, coupled with this there was a "live" switch on the dash that
did not seem to do anything. After a little investigation and some wire
tracing in the engine bay I found my car was wired with the genuine
accessory loom for aux lighting from one of the previous dealers. This then got me onto the next project of getting some spotlights fitted back on the A bar. I searched the web for appropriate lights, there is a massive choice out there in all shapes, colours and sizes, however because I had the stainless bar I felt a set of Chrome spots would look best. The cost of spots can vary tremendously from as little as £25 a pair to over £700. Set your budget out and look for the best you can get at the time. I did not spend a fortune on mine as I just wanted to get a set on there, so I found a set of 55w spots in an online accessory dealer and the spots were for me about the right size approx 5 inches in diameter and had a full chrome housing, removable covers and were only £30 a pair !!, I must admit a was little wary of the "cheap" cost, but when they arrived I was pleasantly surprised how well made they actually were. Now that they have been on for several months, and especially through the winter with the salt etc on the roads, the casing is just starting to show signs of pitting corrosion, a quick polish up with some brasso brings them back to new, but I suppose you get what you pay for in the quality of the chrome casing. I will at some point replace them with a more expensive make / name like Warn / PIAA. Wiring them up was a simple as splicing into the old cut looms and soldering new connections, cover the joins in heat shrink to help keep moisture out, drill 2 holes through the front bumper where the old number plate would sit, then a simple 1 bolt each light onto the A bar and hey presto...lots more light!!! The Genuine aux lighting kit contains all the wires/ plugs / relays and switch needed to complete the job if you wish to have a complete factory install. The Kit part no for the Pre facelift Discovery 2 is STC50039 and it retails for around £65. Its a little on the more expensive side, how ever it does fit perfectly into the existing car setup, and is simply plug an play. It also comes with full installation instructions and could be fitted by any competent DIY'er or mechanic.
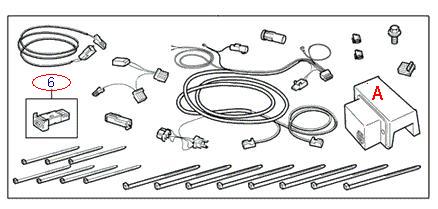
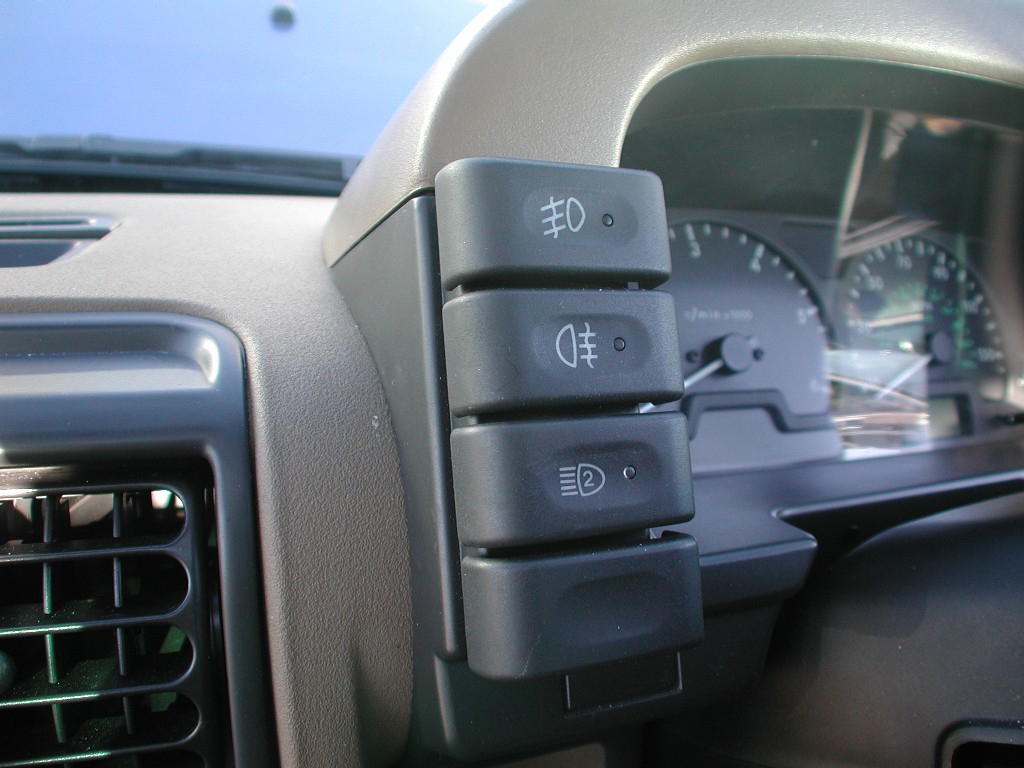
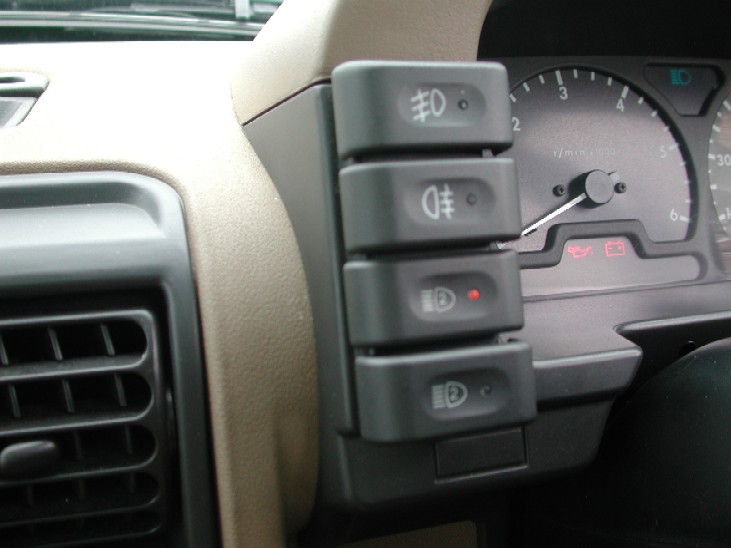
Above is a picture of what's included in the kit, the item circled (no 6)is the Dash board switch that fits to the left hand side of the instrument binnacle, this can be bought separately Part no STC50098 , however because the factory system uses a control unit (item A) to switch on / off the lights, the switch is a momentary action only (not latching) just like the front and rear fog switches, so it would be quite difficult to wire it up to a non-factory install. The Disco spot lights have to be "activated" after the ignition is switched on, by simply pressing the switch, this makes them "live" and then they will flash with the headlight flasher, and then also come on automatically if full beam is selected. They can however be turned on / off with full beam selected by using the switch, so you do have the best of both worlds. Below is a picture of the Aux light switch installed in my Discovery.
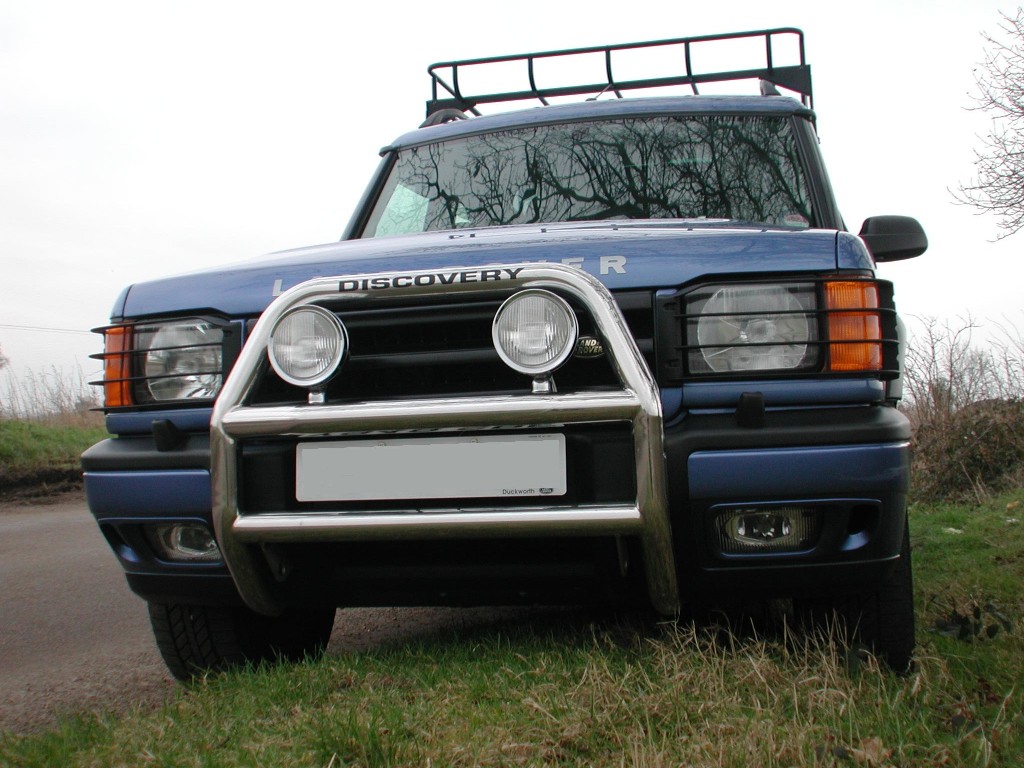
Not much else to say really, here is a couple of pictures of what my spots look like
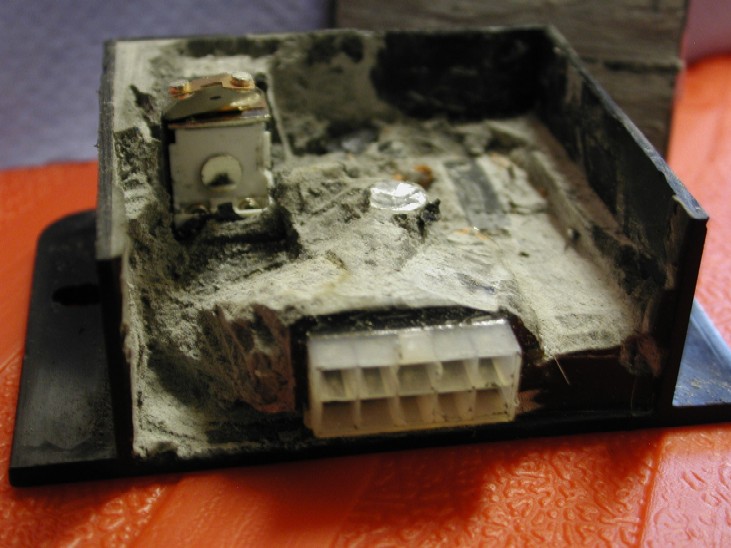
For those of you with the factory Lamp kit, you may find that sometimes they just have a mind of their own and won't work at all, come on ,then go off on their own or whatever they feel like doing at the time. This is quite a "common" problem and really began to annoy me, so it was time to sort it out once and for all!!! First off, I tried to find out why they do it, I checked ALL the wiring out, that all seemed ok, the switch is a momentary switch and that seemed ok to, how ever whilst I had them on and was under the bonnet, I found that if I tapped the relay / control box, the lights went out !!, this seemed to be what happened when driving on country roads with main beam and spots on and if I hit a bump they went of!!!. I also found that the spots would not stay on continuously for more than 2 minutes at a time, they would simply go off and need to be switched on again, for normal road driving this would not be so much of an issue, but for off road driving at night, it would be a real pain in the bum!! So with this in mind, it was time to see what's going on in the control box. Well, it is NOT actually possible to see what is going on inside it as its filled with some sort of puty / filler when its put together in the factory, so it really is a non-servicable part. In the end I cut it open and dug away at the filler to have a look inside anyway and below is the mess you find.
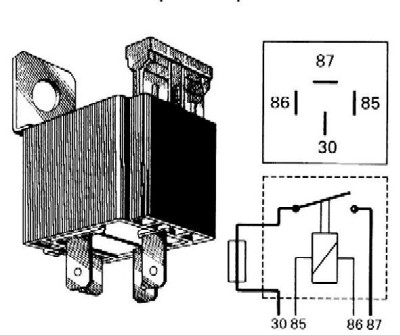
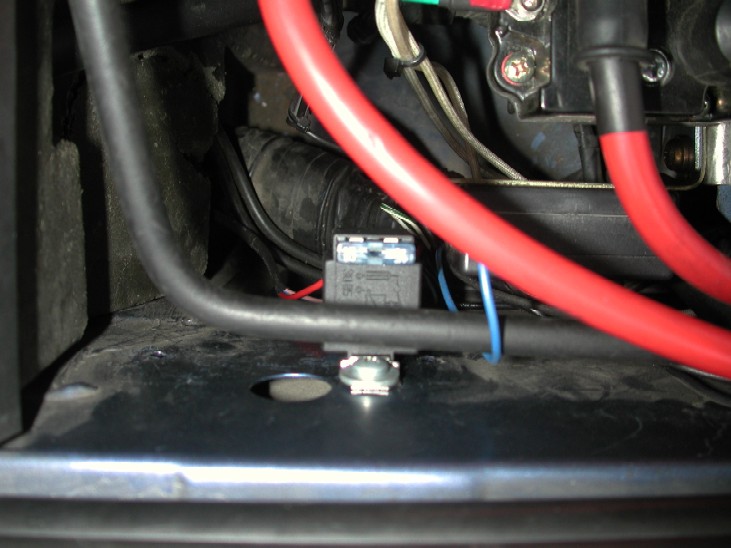
Once you get to this point it is proper pooped !!! and only good for the bin, but a few interesting points, the little relay in the top left corner is very small, so I wonder if its actually up to the job, and the contacts on the relay were quite badly covered in carbon, so maybe that was why they were so intermittent, who knows, its in the bin now!! So now we have to fix the issue somehow. If this article relevant to your car, then you will already have all the wiring in the car and its simply a case of making your own system for them to work. There is 2 ways to do it, 1.) you wire them up directly through a relay so they come on all the time you flash headlights and select main beam, or 2.) you wire them up the same way as the factory kit through a switch so you have the choice whether to have spots on or not. I like to have the choice, plus I like switches to play with as well, and the factory switch also fills and empty space on the dash binnacle. Here is the existing vehicle wiring colours / connections in the factory relay box / plug :- Large red wire = +12v supply from battery Large Black wire = ground to ground stud near ECU 2 x Black wires = grounds or earths for both spot lamps 2 x Blue / yellow stripe wires = +12v supply to spot lamps Small Blue / orange stripe wire = +12v from High beam circuit Green and white wire, = Unsure of connection. NOT NEEDED for new install Small Blue and Red wire = Up to factory switch NOT NEEDED for new install So we now need to use the existing wiring for our new circuit. You will need a 20 amp (min) standard automotive relay, I used one with a built in fuse to remove the need for the existing "messy" inline fuse. here is one below, you can also see them on my roof rack light install page
The terminals on standard 4 pin relays are always the same, and numbered as above 30 = +12v 87 = +12v to load (lamps) 86 = +12v signal (in) 85 = ground / earth So, to start with I cut off the plug that goes to the factory relay box, then fitted some crimps to the wires that I needed. First of you need to connect the large red wire to PIN 30 on the relay. Join the 2 small and 1 large black wires together in 1 crimp, and that goes to PIN 85 of the relay. Next join the 2 Blue / Yellow wires together in 1 crimp, and that goes to PIN 87 of the relay. Now if you wish to remove the switch from the circuit, you can simply connect the Blue / Orange wire to PIN 86 of the relay, tie all the other wires safely out the way, and that's it, your spots will now work ALL the time you either flash your headlights or select main beam. If this is how you want it, then you simply need to drill a hole in the inner wing to mount the relay on its small bracket like below... If you want to keep the switch in the circuit, read on.......
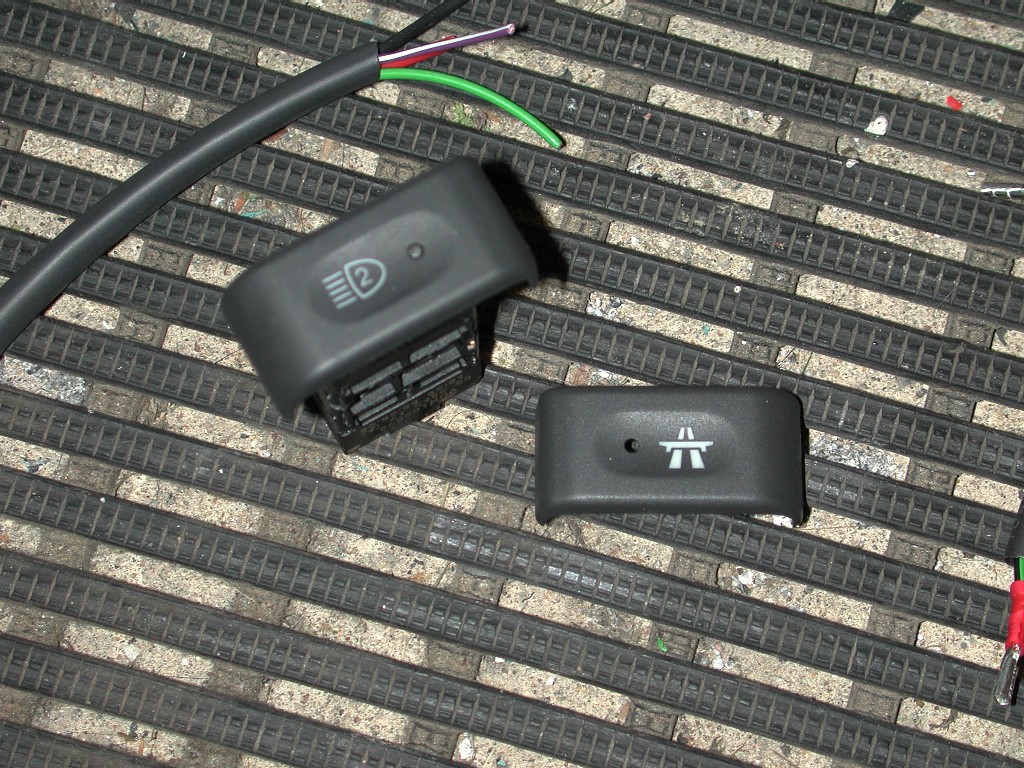
Ok, the factory additional lamps switch is a momentary action only, so its no good for our needs here as we need a latching switch. The best thing to use is a cruise control switch, these are only around £5 from the dealer. Once you have one, you can simply unclip the faces of the 2 switches and fit the additional lamp switch fascia to the cruise switch body like below
This is this the same as what I did for the roof rack lights, how ever you already have the wiring and more importantly the plug on the car to use. The small Red and Blue wires that came from the original loom, run through the bulkhead and up to the switch, these are a bit to small to use, so you can remove those wires from the car, cut them about 2 inches from the factory switch. NOTE!!! If you not happy with removing crimps etc from plugs and using a soldering iron, then I advise you stick to the first version of wiring, or get an experienced auto electrician to do the next bit for you !! Next is the fiddly bit, to continue to use the factory plug, you will need to remove the crimps from the plug, you need to remove the "small" blue and red completely, and the Black wire has to be removed and repositioned into PIN 5 on the cruise switch as it has a different pin layout to the lamp switch. To remove the crimps is very fiddly, first off, unclip the back of the plug, it hinges upwards, then I found a tiny small screwdriver pushed in from the back of the plug will bend down the retainers on the crimps and allow you to pull the crimps out. You may find the small blue and red wires break off at the crimps as you tug them out, don't worry about that. Take your time, its fiddly, but the will come out. Once they are out, move the black wire / crimp over to PIN 5. Now PINS 1 and 4 is what we will use to switch the lights on, PIN 2 is the switch lighting and does not need any modification. So from the engine bay, run a 5 amp wire from the Blue / Orange wire in the original spot loom, through the bulkhead and up to to the switch. This is where we need to use the old crimps from the small blue and red wires, you need to use one of them and solder the new wire onto one of the crimps and then insert it into the plug a PIN 1. Next connect another 5 amp wire to PIN 86 of your new relay, and then run that from there, through the bulkhead again and up to to the dash switch. Solder this wire onto the other used crimp, and push that into PIN 4 of the plug. You will now find the plug does not push straight into the cruise switch body as its not designed to, how ever you will see its just simply a case of cutting of the small lower ribs on the plug with a stanley knife and it will then fit in snuggly. Here's the new wires, and the pin numbers shown on the plug, The black was moved over to PIN 5 and the Red /Brown was left as original (dash lighting) and the 2 new Red and Blue wires on PINS 1 and 4
Now switch on the ignition, and then your headlights, the switch should now be illuminated as all the others are with the lights on, then select main beam, and test your new latching switch. While its latched in the orange indicator light should be on as well.
If you then turn off your headlights the orange indicator should go out telling you the spots are off. With the switch left latched in, anytime you flash or select main beam the spots will come on, but you still have the option to turn them off if you wish. So it works in an identical way to the factory kit, its just a latching switch instead of a momentary one. That is now the end of intermittent spot light !! :o) |
|||